Project 2: Realtime Systems Programming
Project 2: Working with Unix-Nexos-Xinu Realtime System
DUE DATE: 11/17/2017 by 5pm
XINU CODE
XINU wiki
You can work in groups of two
Objectives and overview of the project
We have designed a simple embedded system with common everyday object ("thing") and updated its hardware to serve a unix-like system for general purpose use. The minimal operating system will be enhanced in this project by other features. We will use WRT54GL the wireless router from Linksys [1] and Embedded XINU operating system [2] for this purpose. Students will- Study the architecture of WRT54GL wireless router.
- Test the embedded operating system using simple C programs.
- Modify the EXINU code to add new shell commands.
- Study the software representing various components of the Embedded XINU operating system.
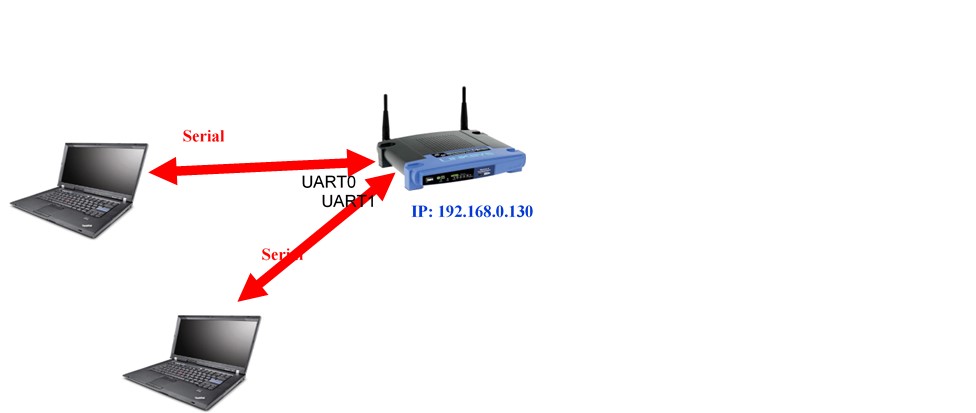
- Study the serial port features (UART0 and UART1) offered by XINU/WRT54GL platform.
- Establish a communication channel between devices connected to these ports via a cyclic executive loop and try out some priority inversion problem/solution.
- Build a simple chat application with user login feature and realtime constraints.
Project Environment
Operating system XINU:XINU ("Xinu Is Not Unix") is a small, academic operating system developed at Purdue University by Dr. Douglas E. Comer in the early 1980s for the LSI-11 platform; it has now been ported to a variety of platforms. Embedded XINU is an update of this project which attempts to modernize the code base (to ANSI-compliant C) and port the system to a modern architecture (specifically the MIPS architecture).
Hardware WRT54GL We will use wireless router WRT54GL as a host for the software we will develop for enhancing the features of an embedded operating system. WRT54GL [8] has a very interesting history the details of which can be found at [3]. The WRT54G is notable for being the first consumer-level network device that had its firmware source code released to satisfy the obligations of the GNU GPL. This allows programmers to modify the firmware to change or add functionality to the device. WRT54GL features a Broadcom MIPS processor BCM5352 (200-250Mhz), a four port Ethernet switch, 802.11b and 802.11g wireless LAN support, a Web interface for configuration of the router, 16Mbytes of SDRAM and 4Mbytes of flash memory. Any modification to the router function itself has to be done by updating the firmware on the flash memory. However we will load the embedded XINU image that we create in the SDRAM. See [4] more details on the memory layout of the SDRAM.
Basic NEXOS Test Environment
The lab environment will be supported by other hardware and software components to provide cross-compiling and networking support. In order to compile Embedded MIPS kernels on a workstation that is not itself a MIPS processor, it is necessary to build and install an appropriate cross compiler. Any time you modify the embedded XINU, the recompiled software will have to be reloaded into the WRT54GL system you are working on. A simple and basic network configuration allocating IP address to the host with the cross-compiler, the wireless router that will host the embedded XINU and a common router that forms the network are shown in Figure 1. The Common Firmware Environment (CFE) [5] is the firmware developed by Broadcom for the BCM947xx SoC platform (among others). It is the first code that runs when the router boots and performs functions:- Initializes the system
- Sets up a basic environment in which code can run
- Optionally provides a command line interface non-standard usage
- Loads and executes a kernel image
Expanded NEXOS Test Environment
The WRT54G can be used alone at any workstation with a serial port and a network connection. This configuration may be suitable for very small laboratory installations concerned only with hardware systems assignments, but to take maximum advantage of the power of our platform it is far more useful to collect many WRT54G's as a pool of backends doled out by a central server. Particularly in the context of more advanced courses in networking, it is best that this pool of backends be managed on a private network, isolated from the production network by a gateway.Figure 2 outlines the typical layout first used at Purdue and later nicknamed the warzone by the TinkerNet Project. A cadre of dedicated target machines resides on the private network (warzone) where students may load and run experimental kernels on demand. These dedicated, backend machines load a new O/S image from the central server across the network each time they reboot, allowing students to refresh the image frequently as they build their system.
What to do?
Section 1 and 2 describe stand-alone operations. While you can try this for your own interest we have prepared the test environment for you, by making the modifications given below. These are given for completeness-sake and for understanding the concepts.- Prepare Hardware
Study the various components of the environment discussed above. Modify the Linksys WRT54GL hardware as follows: Obtain the parts as given in the list. Parts list (available upon request). Open the router. Attach the serial header. Wire serial header to MAX233A RS232 receiver/transmitter. Wire the DB9 connectors to MAX233A. Make sure you solder the socket before mounting the chip itself. - Prepare Software
Download and cross-compile the embedded XINU code. Download TFTP for loading compiled XINU into the router via CFE. Study the XINU code in the subdirectories. Connect the serial port UART0 to the host (laptop/computer) with embedded XINU code and load it. Configure the serial communication software. Power-up the router. Access the CFE and upload the embedded XINU. - Test the setup (5 points)
Build and deploy XINU and examine the commands available. Write a simple test program “Hello XINU world” and test the setup. This can be done by updating xsh_test.c file in the shell directory. This file will be seed file for all the commands you are going to add to EXINU.
- Study Embedded XINU Directory Structure and Code
Download the Embedded XINU bundle/source from here. Examine the directory structure and understand the purpose of various directories. Specifically, study these files in the directories:
- include (header files): shell.h, device.h, gpio.h, interrupt.h, shell.h, tty.h, uart.h
- shell (shell command files): shell.c, xsh_led.c, xsh_help.c
- system (system operations): devtable.c, getc.c, putc.c, read.c, write.c, initialize.c, kprintf.c, open.c, close.c, startup.S
- all the files in tty and uart directories.
- Simple edits to the kernel (5 points)
Now edit the xinu code so that it prints out your own personal logo instead of XINU. Example: BINA, AJAY, QILI, ANDY.. etc. Don’t print our names. Print yours when the system starts. - Write simple shell commands (10 points)
The XINU shell is a subsystem designed as an interface for interacting with the operating system. The shell relies on the TTY driver to receive user input and provide output to the user. When XINU starts, a shell process is spawned for each serial port (or TTY). TTY operates on the UART driver. Study the steps given in http://xinu.mscs.mu.edu/Shell to understand how to create a shell command. Add this shell command:
palindrome string that checks of the given string is a palindrome or not and prints a message. The string can be given as a command line argument See the sample interaction below:
palindrome unix no palindrome beboxeb yes - Study and understand some more commands
1. system (system operations): initialize.c, main.c
The following code from initialize.c will create the main process and shell 0 (TTY0/Console):
Thus there is a root process and main process and shell0 and shell1 (corresponding to uart0 and uart1 of the UART).open(CONSOLE, SERIAL0); ready(create((void *)main, INITSTK, INITPRIO, "MAIN", 2, 0, NULL), RESCHED_NO); The following code in main (main.c) initializes the Shell 1 to be TTY1/SERIAL1: process main(int argc, char **argv) { /* Associate TTY1 with second serial port. */ open(TTY1, SERIAL1); enable(); /* Launch one shell process for each TTY device. */ ready(create((void *)shell, INITSTK, INITPRIO, "SHELL0", 1, CONSOLE),RESCHED_NO); ready(create((void *)shell, INITSTK, INITPRIO, "SHELL1", 1, TTY1), RESCHED_NO);
2. Shell directory: Shell.c file
Read the data structure associated with a shell process and how a line buffer is handled, tokenized etc.
Do you understand how to create a new process now by looking at the above process definitions and process creations?process shell(ushort descrp) { char buf[SHELL_BUFLEN]; /* line input buffer */ ushort buflen; /* length of line input */
3. all the files in tty and uart directories. - Periodic real-time Tasks Scheduling (30 points)
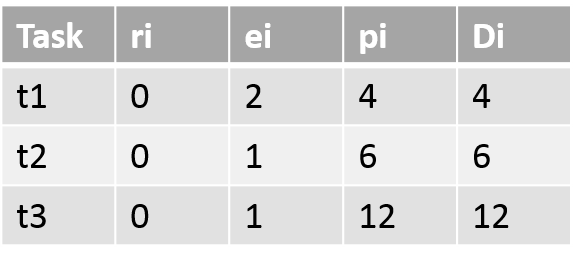
In this component of the project you will use Xinu threads to implement n periodic tasks. For the task set given below design a cyclic schedule: (i) determine the hyper-period (ii) determine frame size, (iii) provide a timing chart and (iv) a cyclic (executive) schedule. ti is the task#, ri is the arrival time, ei is the execution time, pi is the period and Di is the relative deadline.
Based on the schedule write a Xinu program with (i) built-in schedule and (ii) built-in schedule to carry our these periodic tasks. Each task will be represented by a xinu process (thread). We discussed this in class and a solution is available in your text and in the demoes directory. You have to port it to XINU environment. Repeat it for another set of tasks. Write a data-driven code that can execute without recompilation.

- Write a chat program (30 points) using UART serial connection
Add a chat program with login feature that will prefix messages with the originator’s name and print it on the device (lap top). Extend the chat program to allow multiple user (more than 2) and allow chatters to join and leave. In this case there is a super user admin who can kick out chatters with problems. Assume that each chatter (person) is inherently a “problem chatter” with certain probability!
- XINU Semaphores for Synchronization and Mutual exclusion (10 points)
Add two programs as shell commands that will illustrate use of XINU semaphores for (i) synchronization (ii) mutual exclusion. For (i) use threes tasks that will work in sequence passing data from one to the next. For (ii) Create three tasks that will have to share a resource like a counter and update it one at a time. Let the threads/tasks sleep for random amount of time for simulating computation.
References
- WRT54GL: http://www.linuxelectrons.com/features/howto/consolidated-hacking-guide-linksys-wrt54gl/print
- EXINU: http://xinu.mscs.mu.edu
- WRT4GL : http://www.wi-fiplanet.com/tutorials/article.php/3562391
- EXINU memory: http://xinu.mscs.mu.edu/HOWTO:Deploy_Xinu
- CFE: http://xinu.mscs.mu.edu/CFE
- TFTP: http://www.tftp-server.com/tftp_server_overview.html
- What really Happened on Mars?, An email/article by Mike Jones,Dec 1997.http://research.microsoft.com/en-us/um/people/mbj/mars_pathfinder/mars_pathfinder.html
- P. Asadoorian, and L. Pesce, WRT54G Ultimate Hacking Guide, edited by Raul Siles, Syngress, 2007. https://we.riseup.net/assets/48812/Linksys%20WRT54G%20Ultimate%20Hacking.pdf
Appendix A
How to get started with XINU:

How to copy (or download) xinu baseline code, compile, deploy and run it.
1. Obtain the tarball from home directory
cd /home
2. Copy the tarball to your directory
cp xinu_mips-1.0.2.tar.gz ~
3. Go to your directory and untar the package
cd ~
tar zxf xinu_mips-1.0.2.tar.gz
4. Go to xinu_mips-1.0.2
cd xinu_mips-1.0.2
5. View all the files and folders
ls
6. Go to the compile folder
cd compile
7. Compile all the source files
make
8. View available routers
xinu-status
9. You need the file xinu.boot so stay in the compile folder
mips-console router_name
For example,
mips-console moiz
After a lot of messages a prompt appears. Test the xinu deployement using some of the shell commands.
10. You have to release the router once you are done using it.
Press ctrl + spacebar
and then q
Appedix B: Adding a Shell Command
Adding shell commands.

You will adding all the commands as shell programs, we have described below the steps for adding a shell command. This is adapted from exinu wiki; see http://xinu.mscs.mu.edu/Shell This page was added to the wiki on our request.

Lets say we want to add an echo command that echo s the words that list after the command “echo”
1.	Update include directory shell.h file include/shell.h to include prototype
command xsh_echo(ushort stdin, ushort stdout, ushort stderr, ushort nargs, char *args[])

2.	Update shell/shell.c command table to include command as an entry
{echo, FALSE, xsh_echo}

The second parameter says “FALSE” because echo is not a built-in function.
3.	Add xsh_command.c in the shell directory
Add xsh_echo.c file in the shell directory.
Its content is as follows:
=========================================================================
/**
 * @file     xsh_echo.c
 * @provides xsh_echo
 *
 * $Id$
 */
/* Embedded XINU, Copyright (C) 2007.  All rights reserved. */

#include
#include
#include

/**
 * Shell command echos input text to standard out.
 * @param stdin descriptor of input device
 * @param stdout descriptor of output device
 * @param stderr descriptor of error device
 * @param args array of arguments
 * @return OK for success, SYSERR for syntax error
 */
command xsh_echo(ushort stdout, ushort stdin, ushort stderr, ushort nargs, char *args[])
{
    int i;  /* counter for looping through arguments */

    /* Output help, if '--help' argument was supplied */
    if (nargs == 2 && strncmp(args[1],"--help",6) == 0)
    {
        fprintf(stdout, "Usage: clear\n");
        fprintf(stdout, "Clears the terminal.\n");
        fprintf(stdout, "\t--help\t display this help and exit\n");
        return SYSERR;
    }

    /* loop through the arguments printing each as it is displayed */
    for ( i = 1; i < nargs; i++ )
    {
        fprintf(stdout, "%s ", args[i]);
    }

    /* Just so the next prompt doesn't run on to this line */
    fprintf(stdout, "\n");

    /* there were no errors so, return OK */
    return OK;
}
============================================================================
4.	Update compile/Makefile to add the newly created shell file to be included in the compilation process.
In the SHL=…
add xsh_echo.c
5.	Compile and upload
cd compile
make
xinu-status
(find a free server: do not use the server name with a 1 at the end,. Example brylow1)

To upload:
mips-console server_name
ex: mips-cosole moiz

6.	If everything worked alright you will see xsh> prompt.
7.	Type help to see “echo” listed as one of the shell commands
8.	Type the command “echo” and some words. You will see the words you types echoed back.
WRT54GL Wireless Router
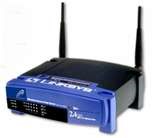
Fig.1 Basic Nexos Test Environment

Fig. 2 Expanded Nexos Test Environment
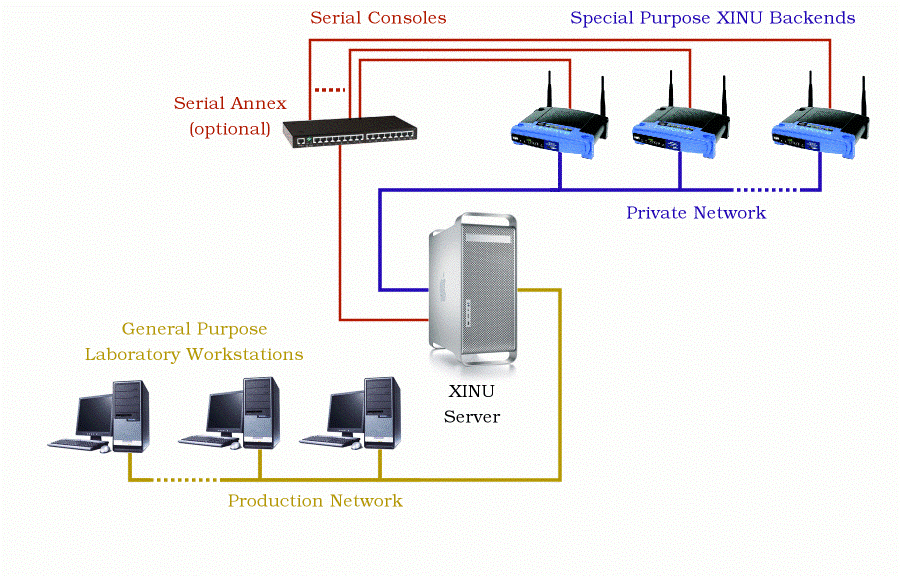
Fig. 3 Serial Connection with UART0, UART 1