Analysis of 42. h6 by Ross Amann and Ken Regan
Analysis after Move 47 by Ken Regan and David Koval.
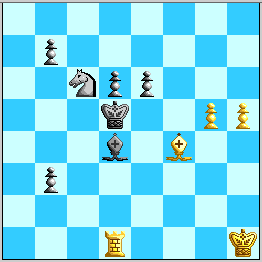
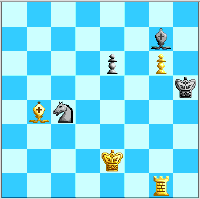
Position after 38. Rd1. A winning alternative?

Position after 38. Rd1. A winning alternative?
This was the move we feared most of all. World Team analysts rapidly concluded that Black's only hope was a desperate sacrificial counterattack with 38...Ke4. Several times in the analysis World Team members gave Black up for lost, until a fantastic line with Black still kicking through Move 48 was worked out. Indeed, shortly after 38. h6 was played, I claimed Black would draw in this line with the counter-intuitive King retreat 48...Kf5!, and this seemed backed by mine and others' analysis. However, my current analysis (August 2000!) indicates that White does have a win, via a full-board Zugzwang at move 50 in a wild position! If this holds up, then this not only stamps 38. h6(?) as a mistake, but also reveals that Black's immediate response to 35. Kh1(!!) was critical and in error, thus adding to the practical brilliance of Kasparov's corner shot.
There is a human-interest story that adds to the mystery. Kasparov stated during the Queen-ending runup that he had indeed intended to play 38. Rd1, but over a dinner a Black "move" came to his head, and he could not refute it. What was this move? No one has said! Since Kasparov has admitted consulting World Team analysis, it is popularly supposed that he did so on this occasion, and that the "move" followed on the heels of the lines we found. I conjectured that the move was my 48...Kf5!, while cases can also be made for 44...Ne7! in the main line below, for 44...Ke4! in the principal sub-line 42. h6 where White wins Black's Bishop, and for several other tricky junctures.
However, it may be none of these, and that Black has a defense not seen in the following analysis at all! This whole line is arguably the most sustained tactical melee in the game. Both sides are only too happy to sacrifice both of their pieces for a pawn or two! There is still scope for paradoxical discoveries to be made. In contrast to the Queen ending, computers are highly useful with these tactics---but, line A) below is a case in which Black evaluates positive for a long time until proving to be dead lost, and there are drawn positions evaluated over +4.5 to White. As usual, I did the analysis only with the freeware program MacChess 5.0.1. Better programs may help you find things that I and MacChess have passed over. (Update 9/25/00: I got a new office workstation and have installed Crafty 17.13 on it, getting 139,000 nodes per second. I can fit all the relevant 5-piece EGTBs plus KRBkbn (same color) and KQQkqq, and will run some checks with it.)
White intends simply to trade off Black's magnificent Bishop by Be3. Let us first see the problem with the reply
(A) 38...b2. White continues accurately with 39. g6! and now:
A1) 39...Ne7 40. Be3! and now Black must play 40...e5 or 40...b1=Q:
A11) 40...e5 41. Bxd4 exd4 42. Rb1 (WT analysis/last move-37 SCO FAQ stopped here with "+/-") and now:
A111) 42...Kc4 43. Rxb2 b5 and White has both:
A1111) 44. Rh2! d3/b4 45. g7 Ng8 46. h6 d2 47. Rxd2 Nxh6 48. Rxd6+/-, and the more straightforward
A1112) 44. g7 Ng8 45. Kg2! (45. Rh2 Nh6!?) b4 46. Kf3 Kc3 47. Rb1 b3 48. Kg4 d3 49. Kg5 Kc2 50. Rh1 b2/d2 51. h6 b1=Q/d1=Q 52. Rxb1/d1 Kxb1/d1 53. h7 d2/b2 54. hxg8 d1=Q/b1=Q 55. Qb8/d5+ +/-. The loss in this queening race probably accounts for dismissing 42. Rb1 as +/-. However, Black has some ways to balance the queening threats with attacks against White's pawns:
A112) 42...d3 43. Rxb2 (43. g7? Ke6! 44. Rxb2 Kf7 seems to hold) and now:
A1121) 43...Kd4 44. g7 Ng8 45. Kg2 essentially transposes into A1112), and White also has 45. Rxb7 d2 46. Rb1 Kd3 47. Kg2 d5 48. Kf3 d4 49. Kg4 (also winning with this move order is 49. Ra1) Kc2 50. Rh1 d1=Q 51. Rxd1 Kxd1 52. Kg5 d3 53. h6 with a similar end. But tougher is
A1122) 43...Ke4! and now White has two ways to win:
A11221) 44. g7!? and now:
A112211) 44...Kf5 45. Rf2+! Kg5 46. Rg2+ Kxh5 47. g8=Q Nxg8 48. Rxg8 d2 49. Rg1+/-.
A112212) 44...Ng8 and now:
A1122121) 45. Rxb7? d2 46. Rb1, and the Reti-like point is 46...Kf3! (46...Kd3? and 46...Ke3? lose as above) and now:
A11221211) 47. Kg1 Kg4! 48. Kf2 Kxh5 49. Ke2 Kg6 50. Rb7 Kh7 51. Kxd2 Nf6 52. Ke3 Nh5=.
A11221212) 47. Kh2 Kg4! 48. Rd1 Kxh5 49. Rxd2 Kg6 50. Rg2+ Kf7 is EGTB= if Black's d-pawn is taken away, so cold drawn as-is.
A1122122) 45. Rh2? and Black can choose between a flashy draw and a winning try:
A11221221) 45...Kf5!? 46. h6 Kg6! 47. h7 d2! 48. Rxd2 Kxh7=.
A11221222) 45...Nh6! and White may even lose unless he finds 46. Kg2 d2 47. Rh1 Kf5! 48. Kf2. However, White counters this by bringing his King into the square of Black's d-pawn:
A1122123) 45. Kg2! and now:
A11221231) 45...Ke3 46. Kf1! b2 47. Rb3+ +/-.
A11221232) 45...Kf4 46. Kf2! (see notes on 46. Kf1!? below) Kg5 47. Rxb7 Kh6 48. Rd7! and now:
A112212321) 48...Nf6 49. Rxd6 Kxg7 50. h6+ Kf7 (50...Kg6 51. h7+/-) 51. Kf3! (51. Ke3 d2! is annoying, though still losing to 52. Ke2! Note that with WK on f1, 51. Rxd3 would be EGTB+/- #26) and now:
A1122123211) 51...Ne8 52. Rxd3 EGTB+/- #26.
A1122123212) 51...Ng8 52. h7+/-.
A1122123213) 51...d2 52. Rxd2 EGTB+/- #25.
A112212322) 48...Kh7/d5 49. Rxd6/d5 Kxg7 50. Rxd3 EGTB+/- #30. (But with White's King on f1 this would be drawn).
A1122233) 45...Kf5 46. Kf3 Kf6 47. Rxb7+/-.
A11221234) 45...b5/b6 46. Kf2! Kf5/f4 47. Rxb5/b6+/-.
Even better for White, however, is the earlier
A11222) 44. Kg2! and now:
A112221) 44...Kf5 45. Kf3 Kg5 46. Rxb7 Nf5 47. Rb5+/-.
A112222) 44...Ng8 45. g7!? transposes into A1122123), though White may have other wins.
A112223) 44...b5/b6!? 45. g7 Ng8 46. Rxb5/b6 d2 47. Rb1 Kf5 48. Rd1!+/-.
A1123) 43...b5!? 44. Rxb5+ Ke4 45. Kg2! d2 46. Rb1 Kf4/f5 47. Rd1! is likewise effective.
Black, however, can try to move up the Kingside counterplay idea.
A113) 42...Ke6 (42...Ke5 gives fewer options) 43. Rxb2 and now:
A1131) 43...Kf6 and now:
A11311) 44. Rf2+? Kg5 45. g7 and now:
A113111) 45...d3 46. Rg2+ Kxh5 47. g8=Q Nxg8 48. Rxg8 d3 49. Rg1+/-.
A113112) 45...Kxh5 46. Rf7 Ng8 47. Rf8+/-.
A113113) 45...Ng8! appears to hold, as 46. Rf8 d3! 47. Rd8 Kh6! 48. Rxd6+ Kxg7 49. Rxd3 is EGTB= without Black's b-pawn, and 49. Kg2/h2 d2! 50. Rxd2/Kg3/f3/h3 Nf6 snares White's h-pawn. But White uses the same idea of bringing the King in the square:
A11312) 44. Kg2! and now:
A113121) 44...Kg5 45. Rxb7+/-.
A113122) 44...d3 45. Kf3+/-.
A1132) 43...Nf5 44. Kg2! +/-.
A1133) 43...Nd5 44. h6+/-.
A114) 42...Ke4 43. Rxb2 and now:
A1141) 43...Kf3 44. g7! Ng8 45. Kg1! is thematic, but 45. Rb6! is even better, showing that Black's King is in too deep.
A1142) 43...d3 44. Kg2! transposes into A11222).
A1143) 43...Kf5 44. Rxb7+/-.
That pretty much closes Black out.
A12) 40...b1=Q 41. Rxb1 Bxe3 42. Rxb7. A tantalizing position!
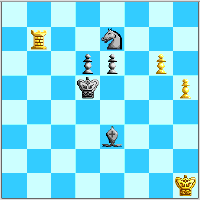
Position after 42. Rxb7, in sub-line.
Black's King is just one step too far to aid his pieces. The key lines are:
A121) 42...Nf5 43. Rb5+! Bc5 (else 44. Rxf5! and 45. g7+/-) 44. g7! Nh6 (44...Nxg7 45. h6 is a standard device with an unstoppable Rook pawn that we will see often) 45. Rb8 Ke5 46. Rh8! Kf6 47. Rxh6+ Kxg7 48. Rxe6. This is a theoretical win for White. Black cannot hang on to the d-pawn, e.g. 48...Kf7 49. Rg6 d5 50. Rg5 Be3 51. Rxd5 is EGTB+/- #30. The basic reason Black loses this ending is shown after 51...Kg7 52. Kg2 Kh6 53. Kh3 (White is in time to save the h-pawn) Bc1 54. Kg4 Be3 55. Rd6+ Kg7 56. Kf5 Kh7 by the sacrificial 57. h6! Be3 (57...Bxh6 immediately loses to 58. Rd7+ Kg7 59. Kg5; if Black's King were on g7 White would play 58. Rg6+ Kh7 59. Kf6! instead) 58. Rg6 Bf4/c1 59. Rg7+! Kxh6 60. Rg6+! Kh7 61. Kf6! and Black's King is pinned down to the "bad corner"---Black can thrash for 20 more moves, but this win was known in the books.
A122) 42...Ng8 43. Rb8 and now:
A1221) 43...Nf6 44. g7 Ke5 45. Rh8!---White avoids 45. g8=Q? Nxg8 46. Rxg8 Kf5! as is exactly what Black is playing for. Now 45...Kf5 is impossible owing to 46. Rf8+/-, and 45...d5 46. h6 Bxh6 (46...Ng8 47. h7! tableau!) 47. Rxh6 Ng8 48. Rh8 Ne7/f6 49. Re8/f8 is ditto. Black has the clever 45...Ng8! 46. Rxg8 Bh6! (46...Kf6 47. Re8! leads into A121), but White untangles by 47. Rh8! Bxg7 48. Rh7 Bf6 (48...Kf6/Bf8 49. h6 Bf8/Kf6 50. Rh8 Be7 51. h7 Kg7 52. Re8 is no better) 49. h6 Kf5 50. Rg7! d5 51. Kg2, and Black cannot save his Bishop.
A1222) 43...Ne7 44. g7 Ke5 45. Re8 Ng8 46. Rxg8 Bh6 transposes into A1221), while 44...Bh6 45. g8=Q Nxg8 46. Rxg8 e5.Ke5 47. Rg6 is no better.
A1223) 43...Nh6 44. g7 Bd4 (44...Ke5 45. Rh8! Kf6
46. Rxh6+! Kxg7 47. Rxe6 or 45...Ng8 46. Rxg8 transpose to above
lines) 45. g8=Q Nxg8 46. Rxg8 Be3 47. Rg6 Ke5 48. h6 Kf5 47. h7! is
another case of being one move too late.
A2) 39... Kc4, and White can choose between:
A21) 40. Bxd6 Bg7 (40...Kb3 41. h6 Kc2 42. Rf1+/-) 41. Ba3 Kb3 42. Bxb2 Kxb2 43. Rd7 and the analysis continues here, or simpler,
A22) 40. h6! Ne7 41. g7 and now:
A221) 41...Bxg7 42. hxg7 e5 43. Bg5 Ng8 44. Rb1 Kc3 45. Bc1! (a theme we shall see later as well) bxc1=Q+ 46. Rxc1+ +/-.
A222) 41...Kb3 42. Bxd6 Kc2 43. Rf1 Bxg7 44. hxg7 Ng8 45. Kg2 b1=Q 46. Rxb1 Kxb1 47. Kf3 wins, for instance 47...Kc2 48. Ke4 Kc3 49. Ke5 b5 50. Kxe6 b4 51. Kf7 Nh6+ 52. Kg6 Ng8 53. Kh7 Nf6+ 54. Kh8 and Black is "a tad unlucky".
A3) 39...Ke4 40. Bxd6 Bg7 (40...Kf5 41. Bf8+/-) 41. Ba3! Kf5 42. Rg1 transposes into a losing variation of the main line below.
A4) 39...e5 40. g7 Ne7 41. Bg5+/-.
Black can try to improve on the last line by:
(B) 38...e5, and now the FAQ gave:
B1) 39. g6 exf4 (39...Ke6 40. Bg5! is trouble) 40. g7 Ne7 41. h6 Kc4/c5 (41...b2 42. h7 b1=Q comes too late as White queens with check, and 41...Ke6 42. Re1+! forces a Queen as well) 42. Rxd4(+) Kxd4 43. g8=Q! Nxg8 44. h7 Ne7 (44...Nf6 45. h8=Q Ke5 46. Qh3+/-) 45. h8=Q+ Kc4 (45...Kd3 46. Qh7+ +/-). Is this clearly a win?
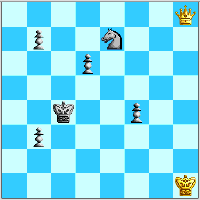
Position after 45...Kc4 in subline. Should Black resign?
The FAQ gave "+/-" after just one more move,
B11) 46. Kg2, but 46...Nc6! appears sufficient to draw! Instead, White must disrupt Black's coordination immediately, with a little old-time materialism:
B12) 46. Qg7! and now:
B121) 46...Nc6 47. Qxb7 Nd4 48. Qc7+! Kd3 49. Qxd6 Kc4! 50. Qc7+! Kd3 51. Qb6! catches Black in an inescapable bind.
B122) 46...Nd5! 47. Qxb7 and now:
B1221) 47...Ne3 48. Qc7+ Kd3 49. Qxd6+ Kc3 50. Qe5+! Kc2 51. Qxf4! is a win in 25, while on 50...Kd3, 52. Qb2! Kc4 53. Qd2! is a winning Zugzwang.
B1222) 47...Nc3! 48. Kg2! d5 49. Kf3 d4 50. Kxf4 d3, and now not 51. Ke3? b2!=, but 51. Qa6+ Kb4 52. Qb6+ Kc4 53. Ke5! Ne2 54. Qc6+ Kb4 55. Kd5! b2 56. Qc4+ Ka3 57. Qxd3+ Kb4 58. Qc4+, and this is a pretty win in 23.
The full analysis of this line is here, and shows how narrow White's win actually is. This shows untapped potential there is in the analysis: what other lines dismissed as "+/-" are so fraught? This verdict may be critical, because
B2) 38. Bc1, which was the answer to 37...e5,
seems no longer to work, as Black's King is not cut off along the
f-file: 38...Ke6 39. Ba3 b5(!) 40. g6 b4 41. h6 Ne7 42. g7 Kf7 43.
Bxb4 Kg6! 44. Bxd6 Ng8 forces a draw.
C) 38...Kc4? 39. Bxd6 b2 40. h6 is +/- as Black's Knight cannot come to the Kingside; 40...Be3 41. h7 Bd4 42. Ba3 leaves Black's Bishop no way to preserve itself.
D) 38...Ne7 39. Be3 e5 40. g6 Nf5 (40...Kc4? 41. Bg5+/-) and now White has both:
D1) 41. g7 Nxg7 42. h6 Nf5 43. Bxd4 Nxh6 44. Be3+ Kc4 45. Bxh6 and now:
D11) 45... b5 46. Kg2 (46. Rxd6 b2 47. Rd1Kc3=) Kc3 (46... b2 47. Rb1 Kc3 48. Bc1+/-) and:
D111) 47. Kf3 b2 48. Ke4 Kc2 49. Rd2+ Kb3 50. Rd1 b4 51. Kd5 Ka2 52. Kxd6 b1=Q 53. Rxb1 Kxb1 54. Kxe5 b3 55. Ke4 Kc2 56. Bg7=.
D112) 47. Bc1! Kc2 48. Rf1 b4 49. Kf3 b2 50. Bxb2 Kxb2 51. Ke2 Kc2 52. Rf8 b3 53. Rc8+ Kb1 54. Kd2 e4 55. Kc3 Kc1 56. Kxb3+ Kd2 57. Rd8 e3 58. Rxd6+ Kc1 59. Rc6+ Kd1 60. Kb2+/-. (check!!)
D12) 45...Kc3 46. Bc1 b5 47. Kg2 transposes into D211).
D13) 45...b2 46. Rb1 (46. Kg2 Kb3=) Kc3 47. Bc1 bxc1=Q+ 48. Rxc1+ Kd2 and:
D131) 49. Rb1 d5 50. Rb5 (50. Rxb7 d4 51. Re7 d3 52. Rxe5 Kc1=) d4 51. Rxe5+/- by transposition into the next line.
D132) 49. Rc7 d5 (49...b5 50. Rb7 d5 51. Rxb5 d4 52. Rxe5 d3 53. Kg2+/-)50. Rc5 d4 51. Rxe5 d3 52. Kg2 Kc1 53. Rc5+ Kb2 54. Kf3+/-.
and perhaps more simply:
D22) 41. Bxd4 exd4 42. Kg2 Kc4 (42... Ke5 43. Kf3 Kf6 44. Kf4+/-) 43. Kf3 Kc3 44. Kf4 Ne7 45. Kg5 (45. h6, 45. g7, and 45. Ke4 are less clear) b2 46. h6 Kc2 47. Rg1 Nxg6 (47... d3 48. h7 $18) 48. Kxg6 d3 49. h7 d2 50. h8=Q+/-.
38. Rd1 Ke4!?
39. Bxd6 Kf5
40. g6 Bg7 (else 41. Bf8+/-)
41. Rg1 ...
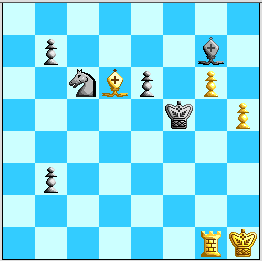
Position after 41. Rg1. Mutual restraint is in order.
White threatens both 42. h6 winning the Bishop and 42. Ba3 to stop Black's pawn and to cover g5 and h6. For example,
E1) 41...b2 42. Ba3 and now:
E11) 42...b5 (note how Black's Knight is dominated) 43. Bxb2! Bxb2 44. g7 and now:
E111) 44...Bxg7 45. Rxg7 Kf6 46. h6 Nd8 47. Rg8 Nf7 48. h7 +/-.
E112) 44...Ne7 45. g8=Q Nxg8 46. Rxg8 b4 47. h6 Be5 (47...Ke4 48. Rg4+ +/-) 48. h7 Ke4 49. Rg4+! is +/-.
E12) 42...Bd4 43. Rb1! wins for White, as 43...Kg5 44. Bxb2 Kxh5 45. Bxd4 Nxd4 46. g7 is too late.
E2) 41... Nd4 42. Ba3! and now:
E21) 42...Ne2 43. Rg2! Nf4 44. h6 Bxh6 45. g7 Bxg7 46. Rxg7 b6 47. Rg3!+/-.
E22) 42...Nf3 and now:
E221) 43. Rg3!? Nd2! (43...Kf4 44. Kg2+/-) and now: !!!
E222) 43. Rg2! and now: !!!
E23) 42...Kf6!? is clever, but a mite too slow. White avoids
E231) 43. Bb2+!? e5 44. Rg3 Ne6! when White's pawns are in peril. A bang-bang draw is 45. Bc1 b2! 46. Bxb2 Nf4 47. Rf3 Kg5 48. Bxe5! Nxh5! (48...Bxe5 49. Rxf4!+/-) 49. Bxg7 Nxg7 and even without Black's b-pawn this would be equal.
White continues more accurately:
E232) 43. Bc1! and now:
E2321) 43...Ne2/f3 44. Rf1(+)! +/-.
E2322) 43...Nf5. This huddle is Black's idea, and now:
E23221) 44. Bg5+!? Ke5 45. Kg2 Ke4! is not very clear. But:
E23222) 44. Kh2! is a case of exquisite timing. Now:
E232221) 44...Bh6 45. Bb2+! e5 46. Kh3! is White's point. Black cannot prevent White from infiltrating by Rf1 and/or Kg4.
E232222) 44...e5 45. Bg5+ Ke6 46. Rb1+/-.
E3) 41... Na7 42. Ba3 Nb5 43. Bc1 b2 44. Bxb2 Bxb2 45. Rb1+/-.
Black initially placed faith in
E4) 41...Na5, but GM Duncan Suttles found that 42. Be7! is an effective antidote. White simultaneously threatens 43. Rg5+ followed by 44. Rb5 and 43. Rf1+ followed by 44. Bg5. Black cannot meet both threats, as shown by:
E41) 42...e5 43. Rf1+ Kg4 (43...Ke6 44. Bg5+/-) 44. Bf6 Kxh5 45. Bxg7 Kxg6 46. Bxe5 +/-.
E42) 42...Nc4 43. Rf1+ Kg4 (43...Ke4 44. Bf6 Ne3 45. Bxg7+/-) 44. Bf6 Bh6 45. g7 Bxg7 46. Bxg7 Kxh5 47. Rb1+/-.
E43) 42...b2 43. Rg5+ and now:
E431) 43...Ke4 44. Rb5 Nc4 (44...Kd3 45. Rxb2+/-) 45. Bf6 Bxf6 46. h6 Nd6 47. Rxb2 Nf5 48. Rf2 Bg5 49. Rxf5 Bxh6 50. Rh5+/-.
E432) 43...Kf4 44. Rb5 Kg4 (44...Nc4 45. Bg5+ +/-) 45. Rxb2 Nc6 (45...Kxh5 46. Rb5+ +/-; 45... Bxb2 46. h6 Nc6 47. Bd6+/-) 46. h6 Bxh6 47. Bf6+/-
E44) 42...Nc6 (hoping to repeat) 43. Ba3 b2 and now:
E441) 44. Bxb2? fails here, as 44...Bxb2 45. h6 Bg7!! 46. hxg7 Ne7 is our first look at a thematic Black means of stopping two passers on the 6th rank! White's best try is 47. Rb1 Kxg6 48. Rxb7 Ng8. As we shall see later, this is winning without Black's e-pawn, but this pawn makes 49. Kg2 Nf6 50. Kf3 e5! a blockade, and 51. Ke3 Kh7 52. Kd3 Nh5 53. Ke4 Nxg7 54. Kxe5 Kg6/h6= comes in time to hold. However, White has simply
E442) 44. Rb1! Kg4 (44... b5 45. Bxb2+/-) 45. Bxb2 and:
E4421) 45...Bxb2 46. Rxb2 Kxh5 47. g7 Ne7 48. Rxb7 Ng8 49. Rb8+/-.
E4422) 45...Ne5 46. Bxe5 Bxe5 47. g7 Bxg7 48. Rg1+ +/-.
E4423) 45...e5 46. Bc1 Kxh5 47. Rxb7 Kxg6 48.
Rb6+/-.
However, Black has a more-subtle way of meeting
these threats:
41. ... b5!
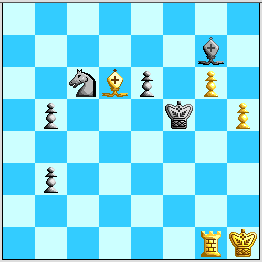
Position after 41...b5! Black's back b-pawn has a point.
The main significance of this move is the way it stops 42. h6. After
F1) 42.h6!? Bxh6 43.g7 Bxg7 44.Rxg7, we gave at the time only
F11) 44...b2? 45. Rg1 Na5 (else 46. Rb1 wins the pawn), overlooking the way 46. Re1! cuts off Black's King. However,
F12) 44...Ke4! holds the draw, mainly because 45.Rg3 Na5 46.Ba3 Nc4! 47.Rxb3 Nxa3 48.Rxa3 Kd4/d5 is EGTB=, with Black's King able to escort the back b-pawn in time! For example, 49.Kg2 b4 50.Ra4 Kc3 51.Kf3 b3 52.Ra8 b2 is in good time. (Note, however, that with White's King on g1 it would be winning.)
There is actually much more going on here. Compared with the R+B vs. N ending from 33...Bxg3, Black is down a major center pawn but White's King is out of play. The full analysis of this position is here.
White's first few alternatives to 42. h6 and the main line 42. Ba3 are rather feckless:
F2) 42.Rf1+ Kg5 43.Bf8 Bxf8 44.Rxf8 b2 45.Rf1 Kxh5 46.g7 Ne7=
F3) 42.Bf8 Bxf8 43.g7 Bxg7 44.Rxg7 b2 45.Rg1 Nd4 46.h6 b1=Q 47.Rxb1 Kg6=.
F4) 42.Rb1 b2 43.Ba3 Kg5 44.Bxb2 e5 45.Rg1+ Kxh5 46.Bc1 Ne7 47.Rg5+ Kh4 and:
F41) 48.Kg1 Bh6 49.Rxe5 Nxg6 50.Re4+ Kh5=
F42) 48. Rg2 Kh5 49.Bd2 Nxg6 50.Rg5+ Kh6 51.Rxe5+
Kh7 52.Rxb5 is a draw.
However, 42. Bc5 is quite dangerous, and illustrates the themes of balance and domination:
F5) 42. Bc5, and now Black seems to squeak through in two different ways:
F51) 42...Ke4!? 43. Ba3! and now:
F511) 43...b2? 44. Bxb2! Bxb2 45. h6 and:
F5111) 45...Ne7 46. g7 Bxg7 47. Rxg7+/-.
F5112) 45...Bg7 46. hxg7 Ne7 47. Rf1 b4 48. Rf7 Ng8 49. Rf8+/-, as Black is just one move too slow.
F512) 43...b4! and now:
F5121) 44. Bxb4 Nxb4 45. Rg4+ Kf5! (45...Kd3? 46. Rxb4 Kc2 47. Kg2 b1=Q 48. Rxb1 Kxb1 49. Kf3 Kc2 50. Kf4+/-) 46. Rxb4 b2 (46...Kg5 47. Rxb3 Kxh5 48. Rg3 essentially transposes) 47. Rb5+ Kg4 48. Rxb2! Kxh5 49. Rg2 with a delicate endgame that Black appears to hold.
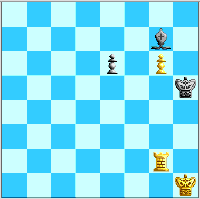
Position after 49. Rg2 in subline. How careful must Black be?
Key play here is 49...Kh6 50. Kh2 Be5+ 51. Kh3 Bf6 52. Rg4 Be5 53. Kh4 Bf6+ 54. Kg3 Be5+ (Black must keep White's King out of f4) 55. Kf3 Kg7! 56. Ke4 (56. Re4 and 56. Rg5 are meetable by ...Bf6) Bd6 (56...Bc7 may be better but illustrating this is more thematic) 57. Kd4. This is a Zugzwang, but one Black can survive. White's Rook on g4 prevents Black from answering Kc4 or Kc5 with ...Bf4-h6 and Kf6, and so Black's Bishop must stay put: 57...Kg7, and White can try:
F51211) 58. g7!? Now Black cannot concede 58...Ba3? 59. Ke5! Bb2+ 60. Kxe6 Bxg7 61. Ke7+/- (mate in 8, actually). However, Black's Bishop has enough air to stay on the h2-b8 diagonal, and 58...Bh2 59. Rg2 Bd6 60. Ke4 Bc7 61. Rb2 Bg3 62. Rb7 Bh2 is not the end of the world, so this is drawn.
F51212) 58. Kc4 Kg7 59. Kb5, and now Black can afford to push the e-pawn: 59...e5! 60. Kc6 Bf8! and now:
F512121) 60. Kd5 Kf6, and thanks to the e-pawn's preventing 61. Rf4+, Black will follow with 61...Bh6 and an impenetrable blockade.
F512122) 60. Rg1 e4 61. Kd5 e3 62. Ke4/e6 e2 63. Kf5 Bb4 comes just in time.
F512123) 60. Rg2 e4 61. Kd5 e3 62. Ke6 e2 63. Rxe2 Kxg6 and Black can exhale, it's EGTB= (5b2/8/4K1k1/8/8/8/4R3/8+w).
F5122) 44. Bc1 and now:
F51221) 44...b2 45. Bg5 is also critical for this sub-line:
F512211) 45...Kd3?! 46. h6 Bxh6 47. Bxh6 Ne7 48. Bg7! Nxg6 49. Bxb2 Nf4 50. Be5! Is this a win? It is very hard to tell!
F512212) 45...Ne5!? 46. h6 Bxh6 47. Bxh6 Nxg6 48. Rb1 Ne5 49. Rxb2 Nd3 may be OK for Black, e.g. 50. Re2+ Kd5 51. Re3 Nf2+ 52. Kg2 Ng4 53. Rd3+ Kc4=, or 50. Rb1 Kd4 51. Bd2 Kc4 52. Kg2 b2!? 53. Ke3 e5 54. Ba5 Nf2!! is a bang-bang draw.
F51222) 44...Ne7!?
F52) 42...b2 43. Be3 Ke4 and now:
F521) 44. h6 Kxe3 45. hxg7 Ne7 46. Rb1 Kf4 47. Rxb2 Kf5 48. Rxb5+ Kxg6 49. Rb7 Ng8 transposes into the drawn ending of E441).
F522) 44. Bg5 and now:
F5221) 44...Kd3? 45. h6 with:
F52211) 45...Bd4 46. g7 Bxg1 47. g8=Q b1=Q 48. Qg6+ +/- is a recurring theme---Black's grief along the b1-h7 diagonal.
F52212) 45...Bxh6 46. Bxh6 Ne7 (46...Kc2 47. Bg5!+/-) 47. Bg7! Nxg6 48. Bxb2 Nf4 49. Be5!, and compared to the analysis of 42. h6, Black cannot get organized in time: 49...Nd5 50. Rg6 b4 51. Rxe6 b3 52. Rc6!+/-, or 49...Ne2 50. Rg4!
F5222) 44...Kf5! 45. Bd2 (45. h6 b1=Q 46. Rxb1 Kxg5 47. hxg7 Ne7 48. Rg1+ Kf6=) is critical in line F52):
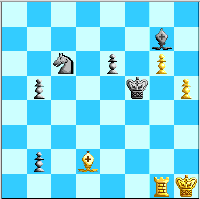
Position after 45. Bd2 in subline.
This is like the main line after 44. Bd2 but with Black's b-pawn still on b5. Black's analogous reply seems to roll with the tactics: 45...Ne7! (not 45...Ne5 46. Bc3!) and now:
F52221) 46. Rg5+ is not the horror it was in the 41...Na5 42. Be7 line: 46...Ke4 47. Rxb5 Kd3! and now:
F522211) 48. Bg5 and:
F5222111) 48...Nxg6? 49. hxg6 Kc2 is an instructive loss: 50. Kg2 b1=Q 51. Rxb1 Kxb1 52. Kf3 Kc2 53. Ke4 Kd1 (no better is 53...Kc3) 54. Bf4 Ke2/c4 55. Be5 Bh6 56. Ke5 Kf3 57. Kxe6 Kg4 58. Kf7 is EGTB+/- #14.
F5222112) 48...Nf5! 49. h6 and now:
F52221121) 49...Bxh6 and:
F522211211) 50. Bxh6 Kc2! 51. Bg5 b1=Q 52. Rxb1 Kxb1 53. Kg2 Kc2 54. Kf3 Kd3 55. Bf6 e5! 56. Kg4 Ke4! and Black escapes thanks mainly to 57. Kg5 Nd4! 58. B-any Ne6+ 59. Kf6 Nf4!, or 58. Bh8 Ne6+ 59. Kg4 Kd5 60. Kf5 e4, or 58. Bd8 Ne6+ 59. Kg4 Kd5 60. Kf5 e4 61. Bb6 Ng7+ and this is drawn even without Black's e-pawn.
F522211212) 50. Bf6! Ng3+ 51. Kh2! b1=Q 52. Rxb1 Nh5 53. Bh8/a1!+/-.
F52221122) 49...Bd4! 50. Kg2 Kc2 51. Kf3 b1=Q 54. Rxb1 Kxb1 Can Black hold this? It appears so, e.g. 55. Ke4 Kc2 56. h7 Kc3 and White's Bishop is kept honest by ...Ne7/h4, or 55. Kf4 Kc2 56. h7 Kd3 57. Bd8 Kd4 and White does not get in. Black is always ready to meet Bf8 by ...Bh8!
F522212) 48. Bh6!? (moves like this might never occur to anyone apart from this game!) Bxh6 49. Rxb2 Ke5, and compared to this endgame with Black's king further back, Black is OK.
F52222) 46. Rf1+ is what MacChess 5.0.1 eventually selects after 4 billion nodes (thinking line F52221122 only +50 for White), but after 46...Ke4 47. Bg5 Nf5 this is like the main line with an extra b-pawn for Black, and White probably has to go after it by 48. Rf4+ Kd3 49. Rb4 Kc2 50. Rxb5 b1=Q 51. Rxb1 Kxb1=.
White's better order of moves commits Black to advance the b-pawn to a square where it can be taken. Black's replies are forced, as 42...b2 43. Bxb2! Bxb2 44. g7! reveals Black as one move too slow, and 43...Ne7 44. Rf1+! Kg4 45. Rf7 Kxh5 46. Rxg7 Nd5 47. Rg8 Nf6 48. Rb8 Kxg6 49. Rxb4 wins. So are White's, as 44. Bxb2 Bxb2 45. h6 Bg7!! or 45. g7 Bxg7 46. Rxg7 b3 47. h6 b2 48. Rg1 Ne5 and Black is just in time (49. h7 Nf7 50. Kh2 Kf6 is stasis).
42. Ba3! b4
43. Bc1 b2
44. Bd2 ...
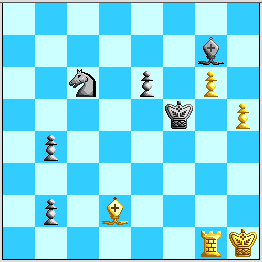
Position after 44. Bd2. A time for desperadoes...
Looking ahead to this point, IM2429 wrote posts titled "bad news: +/- in all lines" and "current state of affairs", the latter summarizing all the Move-38 options and giving here:
G1) 44...Ne5 45.h6 Nf3 (45...Bxh6 46.Bxh6 Nxg6 47.Rb1 +-) and now:
G11) 46. Rf1!? is the most delicately poised case of R+B vs. N+Ps that we have found in the whole endgame. Black must continue 46...Bxh6 47. Bxh6 Kxg6, and now:
!!!
G12) 46.Rb1! Nxd2 47.hxg7 Nxb1 48.g8=Q Nc3 49.Qf7+ Kg5 (49...Ke5 50.Qf1) 50.Qe7+ Kxg6 51.Qxe6+ Kg7 52.Qg4+ Kf6 53.Qf4+ Ke6 54.Qe3+ and 55.Qf2/Qd2+ followed by 56.Qxb2 +-
G2) 44...Ke4 45.h6 Bxh6 46.Bxh6 Ne7 (46...Kd3 47.Bg5!) 47.Rb1! +-
G3) 44...b3 45.Rf1+! Ke4 46.h6 Bxh6 47.Bxh6 Ne7 [47...Kd3? 48.Bg5] 48.g7 (48.Rb1+-) Kd3 49.Bf4! Kc2 50.Rf2+ Kb1 51.Be5 +-, and we can add:
G4) 44...Bc3 45. Rf1+! Ke4 46. h6 and now:
G41) 46...Bxd2 47. g7 Ne7 48. h7 Bc1 49. g8=Q and the skewer strikes again.
G42) 46...Ne7 47. g7 and:
G421) 47...Bxg7 48. hxg7 Kd3 49. Bxb4 Ng8 50. Ba3+/-.
G422) 47...Kd3 48. g8=Q! (an idea that eluded the World Team at first but not its computers:-) Nxg8 49. h7 Ne7 50. Bxc3 bxc3 51. h8=Q+/- as b2 is skewered.
Such was the inventiveness of the World Team, however, that within a few hours several members posted the same paradoxical resource:
44. ... Ne7!
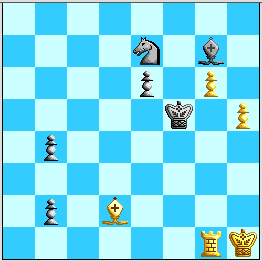
Position after 44...Ne7. Black plugs most holes in the dike...
The idea of this move (besides 45. h6 Bd4!=) is
H1) 45. Bxb4 Ng8!, and now:
H11) 46. Ba3 Nf6 47. Bxb2 Nxh5 48. Bxg7 Nxg7 This is
a draw even without Black's e-pawn (8/6n1/6P1/5k2/8/8/8/6RK+w), a
"Lasker-Lasker position." As it happens, here White can't even
hold his g-pawn.
H12) 46. Bd2, and now Black avoids
H121) 46...Ke4?! 47. Rd1!, when 47...Kd3? 48. Bh6+!
loses though 47...Kf5! may still hold. Instead, Black keeps in
mind that the real objective is to eliminate White's pawns
with:
H122) 46...e5! 47. Bc3 (47. Kh2 Nf6!; 47. Kg2 Kg4=)
Nf6 48. Bxb2 Nxh5 49. Bc1 Nf4 50. Bxf4 exf4 51. Kh2 f3 52. Rg3 Kf4
53. Kh3 f2=.
However, White throws off Black's timing with:
45. Rf1+! Ke4
Here 45...Kg4 was unplayable owing to 46. h6, when Black's King is too far away for 46...Bxh6 to hold. Now 46. h6 meets 46...Kd3! (46...Bxh6 47. Bxh6 Nxg6 48. Rb1 Ne5! transposes into line F512212, which may also be OK for Black) 47. Bxb4 Nf5!, when both 48. hxg7 Ng3+ 49. Kg2 Nxf1 50. g8=Q b1=Q 51. Qxe6 Ne3+ and 48. Rd1+ Kc2 49. hxg7 Kxd1 50. g8=Q b1=Q 51. Qxe6 Qd3 give Black sufficient counterplay to draw.
46. Bxb4 ...
White's point is that now with Black's king in too deep,
I1) 46...Ng8 simply loses to 47. Ba3 and now:
I11) 47...Nf6 48. Bxb2 Nxh5 49. Bxg7 Nxg7 50. Rf7+/-.
I12) 47...Kd3 48. Kg2! Kc2 49. Rf2+ Kb3 50. Bxb2 Bxb2 51. Rxb2+! Kxb2 52. Kf3! e5 53. g7!+/-. Here 48...Kc3 49. Rb1! leads to the same place.
Moreover,
I2) 46...Nd5 comes a cropper to 47. Ba3! and now:
I21) 47...Nf4 and now:
I211) 48. Rxf4+? Kxf4 49. Bxb2 Kg5! 50. Bxg7 Kxh5=.
I212) 48. Bxb2! e5 (48...Bxb2 49. Rxf4+! Kxf4 50. h6+/-) and White can choose between:
I2121) 49. Rxf4+ Kxf4 50. Bc1+ Kf5 51. Be3! with a lengthy but sure win, as Black cannot prevent White's King from swinging all the way around via e8!
I2122) 49. Kg3! Nxh5+ 50. Kg4 Nf6+ (50...Nf4 51. Rxf4+ exf4 52. Bxg7 f3 53. Bd4+/-) 51. Kg5, and once White takes over f5, Black's game will fall apart.
I22) 47...Ne3 48. Re1! and the same fate awaits.
I23) 47...Kd3 48. Bxb2 Bxb2 49. h6+/-.
I24) 47...b1=Q 48. Rxb1 and now:
I241) 48...Nf4 49. h6! (49. Bb2 e5 is less clear) Bxh6 50. Bc1! e5 51. Rb7+/-.
I242) 48...Nf6 49. Bb2+/-.
However, the "other" Knight move combines offense and defense and forces White's reply.
46. ... Nf5
47. Kh2
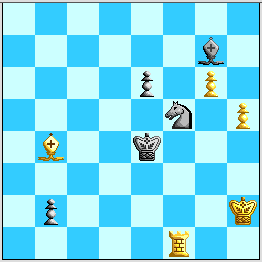
Position after 47. Kh2. Can Black draw from here?
J1) 47...Be5+?! 48. Kh3 Ng3? 49. g7!+/-.
J2) 47...Kd3 48. Ba3! and now:
J21) 48...Kc2 49. Rf2+! Kb3 50. Bxb2! Bxb2 51. Rxf5! is sayonara.
J22) 48...Ne3 49. Rb1! and now:
J221) 49...Nc4 50. Bxb2 Nxb2 51. Rxb2+/-.
J222) 49...Kc2 50. Rxb2+ Bxb2 51. Bxb2 Kxb2 52. g7 Ng4+ 53. Kg3 Nh6 54. Kf4+/-.
J3) 47...Bh6 48. Ba3 Ng7 (48...Bc1 49. Rxc1 bxc1=Q 50. Bxc1 Ne7/Ke5 51. Bg5 is +/-, and it doesn't matter if Black inserts 48...Bf4+) 49. Bxb2 Nxh5 50. Kh3, and Black hits another unluck after 50...Nf4+ 51. Kg4 Nxg6 52. Kh5. White wins after 50. Kh3 since Black's King is cut off, and White's King can waltz up the board.
Since White is threatening 48. Ba3, Black cannot just sit on this position, and so Black tries to restore access to White's pawns.
47. ... Ne3
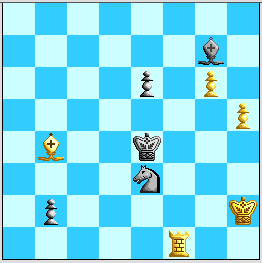
Position after 47...Ne3. Whither White's Rook?
K1) 48. Rg1 and now:
K11) 48...Nd5? is still not on: 49. Ba3! and now:
K111) 49...Kf5 50. Bxb2! (50. Rb1 Nf4 51. Bxb2 Bxb2 52. Rxb2 Nxh5=) Bxb2 and:
K1111) 51. h6? Bg7! (old friend!) 52. hxg7 Ne7 53. Ra1 (53. Kg3 Kxg6 54. Kf4+ Kf7 is drawn even without the e-pawn) Kxg6 54. Ra7 Ng8 55. Kg3 Nf6, and as 56. Kf4 Nh5+ is a no-no, Black sets up in time with 56...e5 next.
K1112) 51. g7! and whether Black plays 51...Bxg7 or 51...Ng8 52. g8=Q Nxg8, this is +/- with Black's King cut off.
K112) 49...Nf4 50. Bxb2! e5 51. Rg5! is over.
K12) 48...Kf5! and now:
K121) 49. Kh3 Nd5! 50. Bd2 Nf4+! 51. Bxf4 Kxf4 52. Rg4+ Kf5 53. Rb4 Kg5 54. Rb5+ e5 55. Rxb2 Kxh5 56. Rg2 (56. Rb6 Kg5 and 57...Bf6=) e4! 57. Rg3! Kh6! 58. Kg2 Bf8! 59. Rg4 Kg7 60. Kg3 e3! 61. Kf3 Bc5 and this appears to be drawn: No matter how White re-positions the Rook, Black has a tempo for ...e2 in time.
K122) 49. Kg3! seems to force 49...Nc4 50. Rh1 with transposition to the main line.
K13) 48...Nc4! and now:
K131) 49. Kg3 Kd3 seems to be just in time: 50. Kg4 Kc2 51. Kg5 Bd4! 52. Rg2+ Kd3! 53. Rxb2 Bxb2 and now:
K1311) 54. h6 Bc1+ 55. Kh5 Bxh6 56. Kxh6 Ne3 57. Kg5/g7 Nf5 58. Kf6 (58. Kf4 Kd4) Ke4 59. Kxe6 EGTB=. Black came just in time, as this is winning with White to move. (Here 54...Ne5 55. h7 Nd7! may also be livable for Black.)
K1312) 54. Be7 Ke4 55. Bf6 Bc1+ 56. Kh4 Ne3 is also fine for Black.
K132) 49. Kh3 Kd3 seems just as fine for Black.
K133) 49. Bc3? Bxc3 50. h6 Ne5 51. g7 b1=Q! doesn't work for White.
K2) 48. Rh1 Nd5! 49. Ba3 Nf4=.
K3) 48. Re1 Kf5! 49. Ba3 (else there was little point to 48. Re1) Nc4! is fine for Black.
A look at the close timing of variation K13), together with line J22), suggests White's best move:
48. Rb1! ...

Position after 48. Rb1! A matter of timing...
Now 48...Nd5 appears to fail to both 49. Ba3 Nf4 50. Bxb2 e5 51. Kg3! and 49. Bd2 (49...Nf4? 50. Bxf4 Kxf4 51. Rxb2!+/- is a major point of 48. Rb1). Black's major options 48...Nc4 and 48...Kf5 appear to transpose, as both are answered by 49. Kg3! (and 48...Nc4 49. Kg3 Kd3 50. Ba3!! is still a win for White). We illustrate the latter as the main line.
48. ... Kf5
49. Kg3! Nc4
Here 49...Nd5 50. Bd2 leaves Black in a bad way, with 50...Nc3 and 50...Nf6 both failing to 51. Rf1+! Black couldn't play 49...Kg5 because of the pin 50. Bd2.
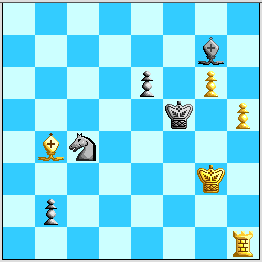
Position after 50. Rh1! Zugzwang!
To demonstrate that this is a true mutual Zugzwang, let us consider the play with White to move. Any Rook move along the first rank permits 1...Kg5, when 2. Rh1 b1=Q! 3. Rxb1 Kxh5 appears to be equal. The only Bishop moves, 1. Be1, 1. Bc5, and 1. Be7, allow 1...Na3 or 1...Nd2 with impunity. This leaves King moves:
This position needs further analysis, but after 4...Kh6 I believe Black can hold. White's King is boxed out, and the endgame arising after 5. Bd2+ Nxd2 6. Kxd2 Be5! (7. Re1 Bf6!) seems tenable for Black, as in line F5121) above. White can improve by 5. Bc5 Kh5 6. Be3 Nxe3 7. Kxe3, but after 7...Kh6 8. Kd3 Be5! 9. Kc4 (9. Re1/Ke4 Bf6! holds) Kg7 10. Kc5 (10. Rg4 Bd6! transposes into analysis of F5121) Bf4! 11. Kc6/Rg4 Bh6! 12. Kd6 Kf6! Black has cycled the pieces around just in time.
Thus the position after 50. Rh1! is a true Grade-A mutual Zugzwang, and this explains why Black would ordinarily expect to be holding in this whole line. Alas, Black's problems now are that Knight moves permit 51. Bd2, and Bishop moves along the a1-h8 diagonal give White time for 51. Kf3 Bg7 52. Ke2 with 53. Kd3 coming. The main tactical points are
L1) 50...Bh6 51. Bc3 Bc1 52. Rf1+! Ke4 53. Bxb2+/-.
L2) 50...Kg5 51. Be7+ Kh6? 52. Kh4!+/-, or 51...Bf6? 52. g7!+/-, or 51...Kf5 52. Rf1+ Ke4 53. Bg5 and Black cannot prevent h6 for long.
L3) 50...Be5+ 51. Kf3 Kg5 52. Ke4 Bg7 53. Kd3 b1=Q+ 54. Rxb1 Ne5+ 55. Ke4! Ng4 (other moves fail similarly) 56. Bd2+! Kxh5 57. Rb5+ e5 58. Kf5+/-.
L4) 50...Ke4 51. Kh4! Bf6+ (51...Kd3 52. Kg5+/- as Black cannot hold the B vs. N ending) 52. Kh3! Bg7 53.Bc3!! is finally on. This takes Black down to:
50. ... e5
51. Bc3! Kg5
52. Kf2. ...
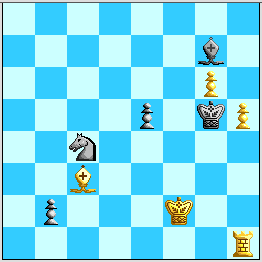
Position after 52. Kf2!
White avoids the trick 52. Kf3? Na3!, when after 53. Bxb2 e4+ 54. Kxe4 Bxb2 Black appears to hold, e.g.55. Rg1+ Kh6 56. Kf5 and now both 56...Nb5 and 56...Nc4 are OK. Now Black has:
M1) 52...b1=Q 53. Rxb1 Kxh5 54. Rg1. In contrast to the above case with Black's pawn still on e6, this case does not appear tenable. White intends Ke2-d3, and eventually penetrating to f5 via e4. After 54...Nd6 55. Bd2! Ne4+ 56. Ke2, Black cannot play 56...Nxd2.
M2) 52...Kh6 53. Ke2, and now:
M21) 53...Kg5 54. Kd3 Na3 does not work:
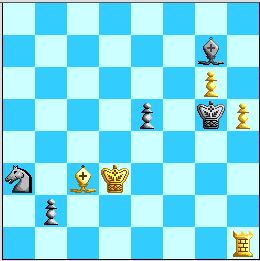
Position after 54...Na3. White to move and win.
55. h6! Bxh6 56. Rg1+ Kf6 57. Bxb2 is +/-, or 55...b1=Q+ 56. Rxb1 K-or-Bxh6 57. Rb3, in both cases winning because the two pieces cannot co-ordinate.
M22) 53...Bf6/h8 54. Bb4! e4 55. Bf8+ Bg7 transposes to the next line.
M23) 53...e4 54. Bxg7+ Kxg7 55. Rb1 Kh6
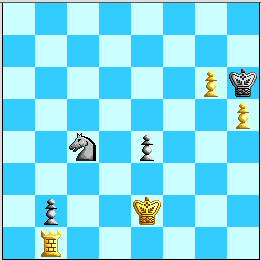
Position after 55...Kh6. A publishable study?
56. Ke1! e3 57. Kd1! Kg7 58. Ke2 Kh6 59. Kd3 Ne5+ 60. Kxe3 Kxh5 61. g7 Ng4+ 62. Kf4 Nh6 63. Rxb2 Kg6 64. Rb7! is EGTB +/-, that's the main point!
The full analysis of White's win from 48. Rb1! is here.