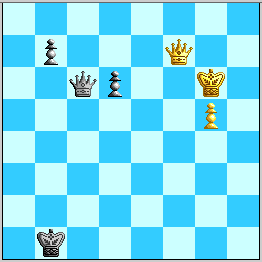
Diagram 1. Not easy for White...
Besides 51...d5, 51...b5, and 51...Ka1, World Team members also considered the idea of activating Black's Queen by
51. ... Qf3.
This move respects the principle that White's King is more dangerous on the f-file (as the 51...d5 play shows) than on the h-file, and also seizes the h1-a8 diagonal. It suffers, however, from the drawbacks of allowing White to activate his Queen with tempo, and most unfortunately, from the position of Black's king on b1. This move doesn't so much lose a tempo as lose an opportunity to gain a tempo as White activates his Queen. Call this a loss of a "half tempo"---but combined with some unfortunate tactics this seems to be enough to lose the game.
52. Qf7! Qc6

Diagram 1. Not easy for White...
Black's last was given by the WT advocates of 51...Qf3. It lays an ambush intended to achieve ...d5 and ...d4 quickly. For instance, 53. Kh6? d5+! 54. g6 d4 is safe for Black so long as the d-pawn is not lost with check, e.g. 55. Qb3+ Kc1! or 55. Qf5/f1+ Kb2!, and on 56. Qf2+ in the latter, Black is OK with both 56...Kc3 57. Qe1+ Kc2 58. Kh7 d3 59. g7 Qd7 or 56...Kb1 as 57. Qxd4 is EGTB= with Black drawing uniquely by 57...b5! Similarly, 53. Kg7 d5! (but not 53...Qc3+?! 54. Qf6 Qc7+ 55. Kh6! Qc1 56. Qf5+ and there seems to be a key difference from 51. Qh5 Qc2+ 52. Kh6 Qc1 53. Qg6+ [when 53...Ka2! 54. Qf7/e6+ d5!! is indeed safe for Black]: 56...Kb2 (56...Ka1/a2 57. Qa5+ Kb1/b2/b3 58. Qb6+ transposes) 57. Qf2+ Ka1/a3 (57...Kc3 58. Qf3+ Kc2/c4/d4 59. Kh5 looks bad for Black) 58. Qa7+ Kb2 59. Qxb7+ is EGTB+/- mate in 84 more moves, while 58...Kb4 59. Qxb7+ is EGTB+/- mate in 65 more.) 54. g6 d4 and Black's Queen is well placed to meet King moves by 55...Qc8+ or 55...Qh1+, e.g. 55. Kh8 Qc8+! (but not 55...Qh1+? 56. Qh7! +/-).
White's strategy is to entice Black's Queen away from the perch on c6 before getting into a race against either the d-pawn or the b-pawn. Incidentally, it appears that all three checking moves by White fail to win---and I (KWR) predict that on 53. Qf5+, 53...Kb2! is the only move to hold, with 54. Kh7 b5! 55. g6 Qh1+! 56. Kg8 b4. If Black's King stood on the a-file then 57. Qa5+ would force the awkward 57...Kb3 and 58. g7 then seems to win, while 53....Kc1 54. Kh7 b5 55. g6 Qh1+ 56. Kg7!! would be effective because 56...b4 57. Qf4+ Kc2 58. Qxb4 is EGTB+/- mate in 85 more moves (but with White's King on g8, 58...Qd5+ would draw), and 56...d5 57. Kf7 makes the blockage of Black's Queen keenly felt. But now 57. g7 b3! is an instance of the fact that with his pawn on g7 against pawns on d6 and b3, White needs his Queen to occupy d5 in order to win. This is instrumental to how in the actual game with 51. Qh7 b5?! 52. Kf6+ Kb2? 53. Qh2+ Ka1 54. Qf4?, 54...Qd5! (55. g6 b4! 56. g7 b3 57. Qa4+ Kb2! 58. Qg4 Qe5+ 59. Kf7 Qd5+ 60. Qe6 Qb7+ 61. Kf6 Qf3+ 62. Qf5 Qc3+ 63. Kg6 Qc4!=) would have drawn. Since 53. Kf6 d5+, 53. Kh5 Qh1+, and 53. Kf5 Qc5+ clearly go nowhere, White is down to the move I gave at the time:
53. Kh7!
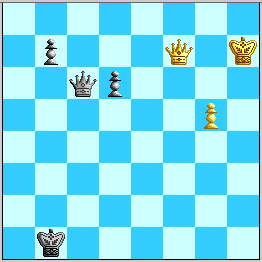
Diagram 2, Black to move. Can Black hold?
Now Black has a wide array of choices:
A. 53...Qh1+ 54. Kg8 and:
A1) 54...d5 55. g6 d4 56. g7, and Black's problem is the pawn hanging with check after 56...d3 57. Qb3+ Ka1/c1 58. Qa3/c3+ Kb1 59. Qxd3+ EGTB+/-, mate in just 20 more moves.
A2) 54...b5 55. g6 b4 56. Qb3+ Kc1 57. Qc4+ Kd1 (Black cannot afford to lose the pawn with check) 58. Qd3+ Kc1 59. g7, and as 59...b3 hangs the pawn with check, Black appears to be lost. (Black is down a tempo compared to the 51. Qh7 b5 52. Kf6+ Kc1! draw.)
A3) 54...b5 55. g6 Qa8+ 56. Kg7, and since 56...b4 57. Qb3+ Ka1 58. Qxb4 is EGTB+/- mate in 40 more moves, or 57...Kc1 58. Qxb4 ditto, and 56...d5 blocks Black's Queen after 57. Kh7, Black seems to have only 56...Qc6 transposing into line D below.
B. 53...d5 54. g6 d4 55. g7! Qh1+ 56. Kg6 Qg2+ (56...Qc6+ 57. Qf6 Qg2+ 58. Kh7 Qh1+ 59. Qh6 Qe4+ 60. Qg6 finishes Black---oh that King on b1!) 57. Kf6 Qf3+ 58. Ke7 Qa3+ 59. Kd7 Qa4+ 60. Kc7 Qa5+ 61. Kxb7! (EGTB+/- #27) Qb4/b5+' 62. Ka8' (EGTB annotation key) Qa5+' 63. Qa7' is Black's basic problem. (And 59. Kd8! is even faster.)
C. 53...Qe4+ 54. g6 (not 54. Qg6? d5!=) and:
C1) 54...d5 55. Kh8!! Qh4+ (55...Qh1+ transposes into A1; 55...d4 56. g7 Qe5 57. Kh7! transposes into B) 56. Kg8 d4 57. g7 and now:
C2) 54...b5 55. Qb3+! Kc1 56. Qxb5 is EGTB+/-, mate in 81 more moves, 55...Ka1 56. Qxb5 ditto! Optimal play in both cases proceeds 56...d5' 57. Qf1+!' ('''only move to win with BK on a1!) Ka2/b2/c2/d2' 58. Qf2+''' Kb3/c3' 59. Qg3+''' Kb2/c2' 60. Kh6'' Qe6' 61. Qf2+' Kb1' 62. Qd4!'' with the same Zugzwang as in the actual game up to 58...Qf5!
C3) 54...Qh4+ 55. Kg8 b5 56. g7 b4 57. Qf5+ K-any 58. Kf7 wins quickly.
D. 53...b5 was given by the advocates of 51...Qf3, continuing 54. g6 Qh1+ 55. Kg7 Qc6. (Here 55. Kg8 Qa8+ 56. Kg7 Qc6 is the same thing.)
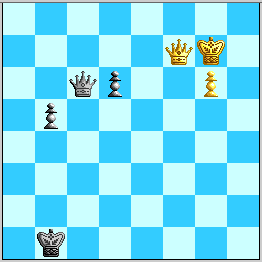
Diagram 3. What is the most efficient White win?
Black has definitely lost a full tempo now, but is the punishment so clear? In my post on September 29, I gave, with new comments in [...]: "
57. Qe3+
Now Black faces a choice: play 57...Kc2, allow White to get d3 with check, or allow White to get d4 with check. Let's try these in reverse order.
A:
57. ... Kb2
58. Qd4+ Ka2 (doesn't really matter, but else we transpose to Qd3+)
59. Kf6! d5+
If instead 59...Qf3+ then 60. Ke6! Qb3+/h3+ 61. Ke7 or 60...Qe2+ 61. Kd7 stops the checks and leads to penetration behind the pawns that I don't think Black can survive. The reason for forcing Black's d-pawn to move, which is what takes this into lines with ...d5, is to cut off a "miracle" drawing attempt that may bode well for us.
60. Kg5 Qc1+
61. Kg4 Qc8+ [61...Qc4 does not work. But draw with BK on a1 or b2 (WQ d3), loss on b1!]
62. Kg3 b4!
Inserting 62...Qc7+ 63. Kg2 b4 64. g7 or 62...Qb8+ 63. Kg2 b4 64. Qxd5+ b3 65. g7 does not help. Now I don't know if White can win by just taking the pawn [EGTB answer is no: 63...Qc7+''' 64. Qf4 Qg7!''' is drawn], but he does have a win by:
63. g7 b3 (...Qb8+ 64. Qf4!)
64. Qa4+ Kb2 (shoot! is ...Kb1 a miracle? [EGTB answer: clearly not, #18])
65. Qg4! Qg8
66. Qe2+ Ka3 (else Qf1+ to f8)
67. Qe7+! the point! and Qf8+-,
or 65...Qc3+ 66. Kh2! Qe5+ 67. Kh1 Qe1+ 68. Qg1+-
B:
57. Qe3+ Kb1
58. Qd3+ Ka2 (or Kc1!?, then c1 is unavailable;
else Qd4+)
59. Kh7! Qh1+
60. Kg8 Qa8+ [oops! 60...b4! is a clear draw!]
61. Kf7 Qa7+ (if ...Qb7+ 62. Kf6)
62. Kf6! Qf2+
63. Ke6 Qf8
64. Qc2+
and gets to c3 with check.
C:
57. Qe3+ Kc2
58. Kf8! Qc8+
59. Ke7 Qd8+ [typo: I meant 59...Qc7+ 60. Kf6 Qd8+]
60. Qe7
and that should do it. Come to think of it, this probably shows that White has many ways to break down Black's passive blockade attempt. Closer inspection might reveal that a White Queen on e2 even might be good enough." [end of my old post].
Well, despite the gaping hole in my line B (perhaps that was pointed out, and I fixed it??), meaning that on 56. Qb3+ Ka1! 57. Qa3+ Kb1 58. Qd3+ Ka2! any plan other than 59. Qe2+(!) may only draw (see footnote). However, here White appears to have (at least) two different ways to win, one drawing on the last sentence of my post and one we do first that appears to be quicker, directly exposing the drawbacks of c6 for Black's Queen.
D.I
56. Qf1+ Ka2
56...Kb2 57. Kh7 Qe4 58. Qxb5+ is EGTB+/- mate in 50 more, 57...Qc2 58. Qxb5+ mates in 40 more; 56...Kc2 57. Kh6! d5 (57...Qe4 58. Qxb5 is EGTB+/- with BK on a2 or c2) 58. Kh7 (the point is that Black's King on c2 blocks the reply 58...Qc2) d4 59. Qe2+ K-moves 60. g7 Qh1+ 61. Kg6 Qc6+ (with Black's King on c1, 61...Qg1+ 62. Kf7 d3 is clever but 63. Qxd3 mates in 28 more moves) 62. Kf7. Now the analysis of 58...Qe4 in the actual game shows that Black cannot allow an interposition on e6, so 62...Qd5+ is out, and 62...Qd7/b7+ 63. Kf6! assures one. So 62...Qc7+. Now if Black played 59...Kb1 or 59...Kc1, 63. Qe7 Qf4+ 64. Qf6 Qc7+ 65. Kg6 Qg3+ 66. Kh7 and wins. Otherwise, play 63. Kf6 Qf4+ 64. Ke6 Qg3/g5 65. Qe5 and wins soon.
57. Kh6! d5
57...Qe4 58. Qxb5 is EGTB+/- with BK on a2 or c2.
58. Qg2+! Ka3
58...Kb1 and 58...Kb3 will transpose into the note to move 56, and 58...Ka3 will leave Black open to a deadly cross-check from e7.
59. Kh7! b4
59...Qd7+ 60. g7 Qf5+ 61. Kh6 Qe6+ (other moves allow White's Queen to reach h5, or Qg5 interposing to ...Qf4+, which is worse) 62. Qg6 Qe3+ 63. Qg5 Qe6+ 64. Kh7 Qe4+ (64...Qh3+ 65. Kg6 Qe6+ is survivable only if Black played 58...Kb3, but now on 66. Qf6 Qg4+ 67. Kg8! the coming Qf7 will be fatal) 65. Qg6 Qh4/h1+ 66. Qh6 Qe4/b1+ 67. Kh8 Qe5/d4/b2 68. Qh3(+)! wins, as analysis elsewhere on these pages shows.
60. g7 Qc7!
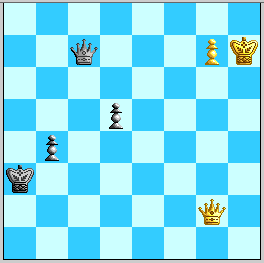
Diagram 4. White must still tread a narrow path.
61. Kg6!
Now 61...Qb8/c8/d8 62. Qf3+! exposes a new danger opened by Black's d-pawn advancing from d6 to d5: 62...b3 allows 63. Qf8+. The litany goes: (a) 61...Qd8 62. Qf3+ K-any 63. Qf8+/- (no checks); (b) 61...Qc8 62. Qf3+ Ka4 63. Qxd5 EGTB+/- #21; (c) 61...Qc8 62. Qf3+ Kb2 63. Qf7! with the d5 form of the basic Qf7 win; (d) 61...Qb8 62. Qf3+ Ka4 63. Qxd5 EGTB+/- #22; (e) 61...Qb8 62. Qf3+ Kb2 63. Qf7! again with the basic Qf7 win versus Black's King on b2. Since 61...Qb6+ 62. Kh5! runs Black out of checks, Black is down to:
D.I.1) 61...Qd6+ 62. Kh5! Qe5+ (Observe how Black never gets a chance to occupy g8 with the Queen until White's King flies the coop---MacChess 5.0.1 sees +660 after 300+ million nodes.) 63. Kh4! Qf4/d4+ 64. Qg4 Qf6+ 65. Qg5 Qd4+ 66. Kh3+/-, or 63...Qe7+ 64. Kh3 Qe6+ 65. Kh2 Qg8 66. Qh3+ b3 67. Qh8+/-.
D.I.2) 61...Qc6+ 62. Kg5! and:
D.II
57. Qe2+ Ka1
Here 57...Ka3/b3/c3/c1 58. Qe3+ should be like line "C" in my post, and 57...Kb1 will leave Black open to a crosscheck on f5 later on.
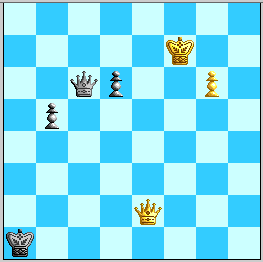
Diagram 5, Black to play. The "Tempo-Up Win".
Now 58...Qc4+ doesn't work, and 58...Qb7/d7+ 59. Kf6 runs Black out of checks. Black has:
D.II.1) 58...b4 59. g7 Qd5+ (other checks also lose quickly) 60. Qe6 Qb7+ 61. Kf6 Qf3+ 62. Qf5 Qc3+ 63. Kg6 Qc4 64. Qf6+ Kb1 65. Kh7!+/-.
D.II.2) 58...Qc7+ 59. Qe7 Qc4+ 60. Qe6 Qc7+ 61. Kf8 (but not 61. Kg8? Qc4!=) Qd8+ (61...Qb8+ 62. Qe8+/-) 62. Qe8! Qf6+ 63. Qf7 Qd8+ (63...Qh8+ 64. Ke7 Qe5+ 65. Kd7 b4 66. g7! Qb5+ 67. Kc7! Qa5/c5+ 68. Kb8! and: (i) 68...Qd8+ 69. Kb7+/-, (ii) 68...Qb5+ 69. Qb7 Qe8+ 70. Qc8! Qb5+ 71. Ka7+/-, and (iii) 68...Qb6+ 69. Qb7 Qd8+ 70. Qc8 Qb6+ 71. Ka8 Qa5+ 72. Kb7 Qd5+ 73. Kb8! Qb5+ 74. Ka7+/-, a snakelike way to take advantage of Black's King on the a-file) 64. Kg7 and now:
(a) 64...b4 65. Qf1+ (65. Qa7+ Kb1! 66. Kf7?! Qg5! 67. g7 Qf5+ 68. Ke8 Qc8+ 69. Ke7 Qg4! looks drawn) Ka2 (65...Kb2 66. Qf6+) 66. Qf2+ Ka3 (66...Ka1/b1 67. Qe1+ Ka2/c2 68. Qxb4 EGTB+/- #71 with BK on a2, ditto with BK on c2; 66...Kb3 67. Kh7! and soon +/-) 67. Qa7+! (now it works!) Kb2 68. Kf7 Qg5 69. g7 Qf5+ (69...Qc4+ 70. Kf8 Qc8+ transposes) 70. Ke8 Qc8+ (70...Qg6+ 71. Qf7 and 70...Qe4+ 71. Kf8 Qf5/f3+ 72. Qf7 are cases of the basic Qf7 win) 71. Ke7 and now:
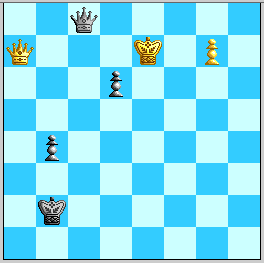
Diagram 6. Black cannot exploit the tempo gain.
(a1) 71...b3 72. Qf2+ Ka3 73. Qf8! is a new kind of Pin Battery ambush: 73...Qb7+ 74. Kxd6 is EGTB+/- #20; 73...Qc7+ 74. Ke6 Qc4+ 75. Kxd6 is EGTB+/- #22; 73...Qc7+ 74. Ke7 b2 75. Qa8+ Kb3 (...Kb4 76. Qe4+ covers b1) 76. g8=Q b1=Q (76...Qc4+ 77. Kxd6 is EGTB+/- #14) 77. Qd5+ is a quick 4Q win (verified by MacChess 5.0.1).
(a2) 71...Qg4! and now White appears to have two ways to win:
(I) 72. Qf2+ Ka3 (other moves are less challenging) 73. Qf7 Qe4+ (73...Qg5+ 74. Ke8 Qb5+ 75. Kf8 Qb8+ 76. Qe8+/-; 73...Qh4+ 74. Kd7! Qg4+ 75. Kc7+/- or 74...Qh3+ 75. Kd8 Qh4+ 76. Kc7+/-) 74. Qe6 Qb7+ 75. Kf6 Qf3+ 76. Qf5, and while 76...Qc3+ 77. Kg6 Qc4 78. Qf3+! Kb2 79. Qf7 is the basic Qf7 win, Black can set a stiffer practical challenge with 76...Qa8!---if you give up trying to find White's win :-), click here.
(II) 72. Kd8!? and: (i) 72...b3 73. Qf7 Qg5+ 74. Ke8 wins similarly to (a2.I), or 73...Qh4+ 74. Kc7; (ii) 72...Qg5+ 73. Ke8! looks like transposing into (i) (note also that 73. Qe7 is the harum-scarum Qe7 interposition win); and (iii) 72...Qg6 73. Qd4+ Ka3 74. Ke7! transposes into later stages of the Qe7 interposition win.
D.II.3) 58...Qd5+ 59. Qe6 Qb7+ and now:
(a) 60. Kg8 Qa8+ (60...b4 61. g7 b3 62. Qe1+! Ka2 63. Kh8+/-) 61. Kg7! Qb7+ (61...Qa7+ 62. Kh6+/-; 61...b4 62. Qe1+ Ka2 63. Qxb4 is EGTB+/- as before) 62. Qf7 Qc6(!) essentially repeats---but this still allows White to transpose to the win above, and is useful for other purposes.
(b) 60. Kf6 Qf3+ 61. Qf5 Qc3+. Now in contrast to the case of Black's King being on a3, 62. Ke7?! b4 63. Kf8 b3 64. g7 b2 65. g8=Q b1=Q is =, as White has no checks. And, 63. Qf1+ Kb2 64. Qg2+ Kb1! or ...Kb3! need more work... But White has 62. Kf7 Qc7+ 63. Kg8!
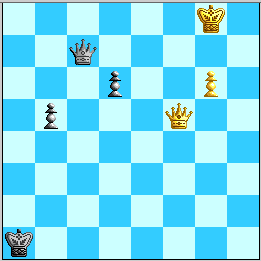
Diagram 7. Compare to move 61 of line D.II.2.
Not 63. Kf8? as 63...Qb8+! 64. Kg7 b4! reveals that White's Queen is misplaced, and probably draws!: 65. Kh7 Qa7+! 66. Qf7 Qe3! and we have transposed to White's failed winning attempt in the analysis of 54. Qf4 Qd3.
Now both 63...Qb8+ and 63...Qd8+ lose to 64. Qf8 and 65. g7 with play similar to things seen before, and 63...d5 64. g7 d4 65. Qf7! wins. So Black tries 63...b4, but 64. Qf1+! (timing! Not 64. Qf6+? Qc3! or 64. g7? b3 65. Qf6+ b2 66. Kh8 Qc8+!! 67. g8=Q Qh3+ with a perpetual!) ...Kb2 65. g7! b3 (Queen checks lead to wins seen above) 66. Qf6+ K-any 67. Kh8+/-.
This completes both parts of the demonstration that 51...Qf3 loses.