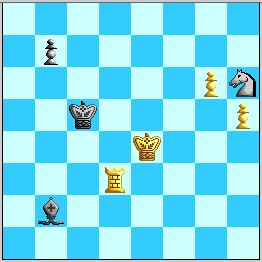
Fig. 1: White to move and win.

Fig. 1: White to move and win.
(Color coding: Bold black for main line, red for red-letter tries,
bold red for important wins off the main line.)

First, some thematic tries:

T1) 1. Rb3!?  White wins Black's last pawn with tempo and then cuts off
              Black's King with tempo---how could anything be better?
       1...Bf6! (only move) 2. Rxb7 Kd6! and now:
    T11) 3. Rh7 Ng8 4. Kf5 Bc3! and now:
       T111) 5. g7 Ne7+! 6. Kg5 Ke6 7. h6 Bf6+! (7...Kf7 8. g8=Q+! wins)
             8. Kh5 Kf7 9. Rh8 Bxg7 10. Rh7 Nf5 11. hxg7 Kg8! is a
             bang-bang draw.
       T112) 5. Ra7/b7 Nh6+! undoes all White's progress,
       T113) 5. h6 Bd2=.

    T12) 3. Rb6+ Ke7 4. Kd5 (4. Kf4 Ng8! and Black cannot be budged)
            4...Bg7! and now:
       T121) 5. Rb7+ Kf6 6. Ke4 Bf8! regroups in time.
       T122) 5. Re6+ Kd7 6. Re2 Ng8 also repels further progress.
       T123) 5. Ra6, and now Black can even afford the luxury of
                5...Ng8?! 6. Ra7+ Kf6 7. Rf7+ Kg5 8. Rxg7 Nf6+ and
                then 9...Nxh5 is a known "Lasker-Lasker"-type draw!

T2) 1. Rd7!? b5 2. Rh7 Ng8 and now:

Fig. 3: Here White is too slow.
   T21) 3. g7 Ne7! 4. h6 Ng8! is Black's basic way of holding up the
        pawns, with 5...Nxh6!= coming next whatever White does.
        (Black must be careful to have his King off the 2nd and 3rd
        ranks, however.)
   T22) 3. h6 Kb4! leaves White totally tied up, while Black will play
        4...Kb3! and 5...b4 for an unbreakable cocoon.  Sheltering the
        King and Bishop on the b-file grants White no tempo moves to
        get his h7-Rook out of the way.
   T23) 3. Kf5 b4 is too slow---later White will get this a whole tempo
        up and still fail to win.

Line T22) hints that driving Black's bishop off the "sheltered" square b2
is a good idea.  Indeed, the intended key move is:

1. Rd2!
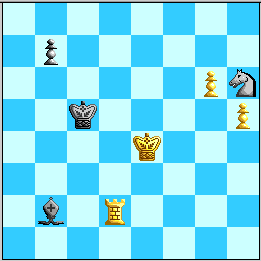
Fig. 4: Drive the Bishop for later attack.
with the following main lines:

A) 1...Bc3? 2. Rc2 Kb4 3. Kf4! (the too-hasty 3. Rxc3? Kxc3 4. Kf4 b5
   5. Kg5 b4! 6. Kxh6 b3 7. g7 b2 8. g8=Q b1=Q leads to an important
   position known to be drawn from Ken Thompson's 5-piece endgame CDs)
   and now:
   A1) 3...Kb3 (or K-any) 4. Rxc3+! is winning now.
   A2) 3...b5 4. Kg5 Ng8 5. Rxc3+! wins since Black budged his knight.
   A3) 3...Bf6 4. Rc7 b5 5. Rh7 Ng8 6. Kf5 and now:
      A31) 6...Bd4 7. Ke6 and:
         A311) 7...Kc5 8. h6 Nxh6 (8...Kb4 9. Rd7+/-) 9. Rxh6 b4 10. Rh5+!
               followed by 11. Rh4 X-rays Black's Bishop to the b-pawn,
               as Black cannot protect it, and 10...Kc4 11. Rh4 b3 12. g7 b2
               13. g8=Q b1= Q 14. Kd6+ is a lethal attack.
         A312) 7...Kc3 8. h6 Nxh6 9. Rxh6 b4 10. Rh3+! is the same idea.
      A32) 6...Bc3 7. Ke6 and now:
         A321) 7...Kc4 8. Kf7 Nf6 9. g7! wins speedily as 10. g8=Q is check.
         A322) 7...Ka3 8. Kf7 and:
            A3221) 8...Nf6 9. g7 Nxh7 10. g8=Q Black is too dispersed to
                   survive.
            A3222) 8...b3 9. Kxb8 b2 10. Ra7+ exploits the bad location of
                   Black's King.
         A323) 7...Nf6 8. g7+/- again.
         A324) 7...Kc5 8. Kf7 wins, but 8. h6! is faster.
      A33) 6...Bb2 7. Ke6 wins with similar play to A32), worse for
           Black since the bishop blocks the b-pawn.  Computers show
           Black's last stand as 7...Ka3 8. Kf7 Nf6 9. g7 Nxh7 10. g8=Q
           Nf6 11. Qa8+ Kb4, but eventually the White h-pawn wins a piece
           and the game.  The final question at the end will be whether
           White can win this kind of ending /without/ the h-pawn!
      A34) 6...Ba1 7. Ke6 is likewise effective.  Overall, Black's King
           blocking the b-pawn with 2...Kb4 costs Black key tempi.

B) 1...Bh8 (or 1...Bg7) 2. Rd7 and the 3. g7 threat forces another B move:
   B1) 2...Bb2 (2...Bc3 3. Rc7+ is even worse) 3. Rxb7 Ba1 (3...Bf6
       4. Rh7 Ng8 5. Kf5 is a key step ahead of T11) 4. Rh7 Ng8
       5. Kf5 is simply worse for Black than the next line.
   B2) 2...Ba1 3. Rxb7 Kd6 How does this differ from line T1)? 4. Rh7 Ng8
       5. Ra7! and now:
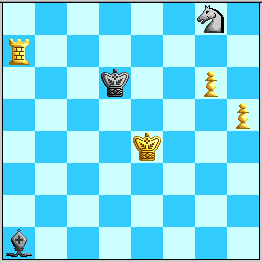
Fig. 5: White extricates his Rook and prevents Black from regrouping.
      B21) 5...Nf6 6. Kf5 wins a piece and the game.
      B22) 5...Bb2 6. Rb7! and now:
         B221) 6...Bc3 7. Rb3! and now:
            B2211) 7...Ba1 8. Kf5! and Black's lack of access to the
                   c1-h6 diagonal prevents him from expelling White's
                   forces.
            B2212) 7...Bf6 8. Kf5! and the lack of access to the c3-square
                   leaves the same fate in store for Black.
         B222) 6...Bf6 7. Kf5 Bc3 8. g7! wins because White's Rook is
               not bottled up on h7.
      B23) 5...Bc3 6. Ra3! is similar to B221).
      B24) 5...Bf6 6. Kf5! is similar to B222) with the important nuance
           6...Bd4 7. Ra3! and again, Black's Bishop cannot get onto
           the saving c1-h6 diagonal.

   [It should be mentioned that 3. Kf4 wins too, with:
      B21') 3...b5 4. Kg5 Ng8 [needs details---more laborious]
      B22') 3...Kc6 4. Rh7 Ng8 5. g7! with:
         B221') 5...Nf6+ 6. Kf5 Nxh7 7. g8=Q and the h-pawn eventually
                decides.  (The riddle at the end will be whether White
                can win this kind of position /without/ the h-pawn!)
         B222') 5...Ne7 (Black must avert 6. Rh8) 6. h6! Ng8 7. Rh8 and
               the point is that 7...Nxh6 8. Rxh6 is /check/.
         B223') 5...Kd6 6. Rh8 Ke6 7. Rxg8 Kf7 8. Rb8 Kxg7 9. Rxb7+ Kh6.
                It is worth noting that this ending is a known win---the
                key idea is to sacrifice the h-pawn on h6 at some moment
                and win because Black's King is in the "bad corner".
      B23') 3...Bf6 4. Rh7 Ng8 5. h6! wins with a tempo up over the
            main line---see below.]

   B3) 2...Bf6 3. Rh7 is even worse (with WK on e4) than line C next.

C) 1...Bf6 2. Rd7.  White is /not/ threatening the b-pawn, but what can
   Black do?
   C1) 2...Kc6? 3. Rh7 wins as in B222).
   C2) 2...Ng8!? 3. Kf5! (again not 3. Rxb7? Kd6!=) and now:
      C21) 3...b5 4. h6! Nxh6 5. Kxf6 b4 6. Rh7 Ng4+ 7. Ke6+/-, or
           6...Ng8 7. Kf7+/-.  (In general, Black's Knight cannot
           watch the last White pawn---only the Bishop can.)
      C22) 3...Ba1/d4 4. Rxb7 Kd6 5. g7 is +/- now, because compared
           to T11), White's Rook is not bottled up on h7.
      C23) 3...Kc6 4. Rd2!, and now the threat of 5. h6! forces Black's
           Bishop to move:
         C231) 4...Ba1 5. Rd8 Ne7 (5...Nh6 6. Kg5+/-) 6. Ke6+/-.
         C232) 4...Bg7 5. Ke6 Nh6 6. Rd7 Bc3 7. Rh7 Ng8 8. Kf7+/-.
   C3) 2...b5 of course is the important defense: 3. Rh7 Ng8, and
       the following crossroads sets off White's main winning idea:

Fig. 6: Find the key winning idea.
      C31) Try 4. Kf5? Bd4! 5. Ke6 b4! and now:
         C311) 6. Kf7 Nh6+! (a devious defense, whereas 6...Nf6 7. g7! b3
              8. Rh8 b2 9. Rc8+! Kd6 10. Rb8 Ng4 11. Kg6 Nf6 12. h6 can be
              shown to win for White) 7. Rxh6 b3 8. g7 Bxg7 9. Rg6 b2!=
         C312) 6. Rd7+ Kb5 7. Kd5 Bb6!= (but 7...Bc3? 8. Rb7+ appears
               to win for White).
      C32) Try 4. g7? Ne7! holds as before.

      C33) 4. h6! entombs White's Rook but sets up an escape with tempo,
           and is White's basic winning mechanism:
         C331) 4...b4 5. Rf7! (executing the main threat, a tempo down
               compared to C21) 5...Nxh6 6. Rxf6 b3 7. Kd3! and with
               the King in the square, Black is cooked.
         C332) 4...Kd6 5. Rf7! Ke6 6. h7 Ne7 7. Rxf6+ +/-.
         C333) 4...Ba1 5. Ra7!+/-
         C334) 4...Bd4 5. Rc7+ Kd6 6. h7 Ne7 7. Rxe7+/- as Black's
               Bishop hangs.
         C335) 4...Bc3 5. Rc7+ and 6. Rxc3+/-.
         C336) 4...Bb2 5. Rc7+ Kd6 6. h7 Ne7 7. Rb7! is a resource White
               lacks with the Bishop on d4 (in line D), and Black is done.

But Black has an elusive first-move defense:

D) 1...Ba1!

White's basic problem is:
   D1) Try 2. Rd7!? b5 3. Rh7 Ng8 and now:
      D11) 4. h6 Kb6! covers both Rook tempoing threats (5. Ra7 and
           5. Rc7+) at one stroke, leaving White stuck! (And as for why
                    Black didn't fork the King and Rook here---we'd be
                    getting ahead of the story...)
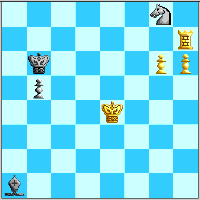
Fig. 7: Stuck!
      D12) 4. Ra7 Bb2 and now:
         D121) 5. g7 Nh6! followed by 6...Bf6! slams the door shut.
         D122) 5. Kf5!? b4 and now:
            D1221) 6. Ke6 Bd4!? basically transposes into C31), but
                   6...b3 also is fine.
            D1222) 6. g7 b3 and White is too slow.
      D13) 4. Kf5 Bd4!? shows that Black at least transposes into C31).

   D2) Try 2. Rg2 Bg7! 3. Kf4 b5 4. Kg5 b4 and White cannot penetrate
       with his Rook in time.

   D3) Try 2. Rd1!?, but 2...Bb2 hangs tough, and White at best
       transposes into the main line with 3. Kf4.

   D4) 2. Kf4! muscles in on Black's Knight, while delaying Rd7.
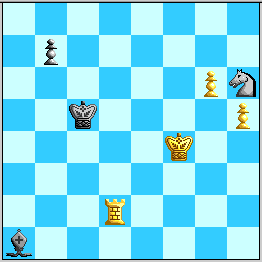
Fig. 8: Attack via g5 as well as d7.
Black cannot deny White's coming Rook entry because of a nifty tactic:

      D41) 2...Kc6 (Computers think this flat-out equalizes for a
           long time) 3. Kg5 Bg7 4. Rd8 and now:
         D411) 4...Kc7 5. Rh8!! springs Black's fortress, with:
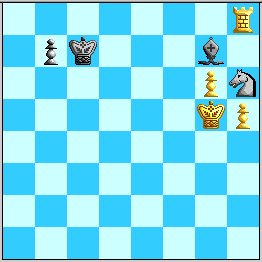
Fig. 9: Eight-ball in the corner pocket.
            D4111) 5...Bxh8 6. Kxh6 b5 7. Kh7! b4 (Bishop moves lose to
                   8. h6) 8. Kxh8 b3 9. g7 b2 10. g8=Q b1=Q 10. Qh7+!
                   trades Queens with Black's King too far away.
            D4112) 5...b5 6. Rxh6 b4 7. Rh7 wins by pin.

         D412) 4...b5 5. Rc8+ (the snappiest) and now:
            D4121) 5...Kd6 6. Ra8! Ke7 (else 7. Ra7 wins the house)
                   7. Rb8! triangulates Black out of his b-pawn.
                   Compared to line T11), White's King has a firm hold of the
                   g5 square, and Black will eventually be suffocated on the
                   last rank, e.g. 7...b4 8. Rxb4 Kf8 9. Rb8+ Ke7 10. Rb7+
                   Kf8 11. Rd7! Zugzwang.
            D4122) 5...Kb6 (other moves allow 6. Rc7) 6. Re8! penetrates.

      D42) 2...b5 3. Kg5 Ng8 4. Rc2+! (to reach c8) and now:
         D421) 4...Kd6 5. Rc8 Ne7 6. Rb8! Kc5 (6...Kc6 is no better) 7. h6!
               Nxg6 8. Kxg6 b4 9. Kf5 and White has time to get within the
               square of Black's pawn, when the win becomes easy.
         D422) 4...Kd5 5. Rc8 Ne7 6. Rb8 Kc4 is Black's extra option here,
               but 7. h6 Nxg6 8. Kxg6 b4 9. Kf5! b3 10. Ke4 and now:
            D4221) 10...Bc3 11. Rc8+ Kb4 12. Kd3! (not 12. Rxc3 b2!) wins.
            D4222) 10...Bf6 11. Rc8+.  White's King gets in the square.
         D423) 4...Kb6/b4/d4 5. Rc8 wins as Black trips over himself.

      D43) 2...Bf6! and now White has to act:
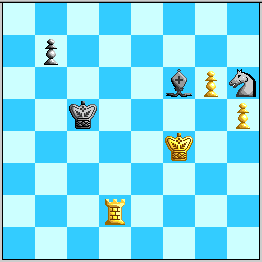
Fig. 10: White needs to execute now.
         D431) Try 3. Rg2? Kd5! (only move!) 4. g7 Be5+! 5. Kg5
               (5. Ke3/f3 Ng8= gives too much ground) 5...Bxg7
               6. Kg6 Bf8 7. Rf2 Bc5! leads to saving geometry after
               8. EM+ Ke4 with 9. Kxh6 impossible owing to 9...Be3+.

               Thus White has nothing more than to plunge in:

         D432) 3. Rd7 b5 4. Rh7 Ng8 and since 5. Kf5? Bd4! transposes
                into C31), White really has only 5. h6.  The same main
                idea as C33), but with White's King on f4.
                What difference does this make?:
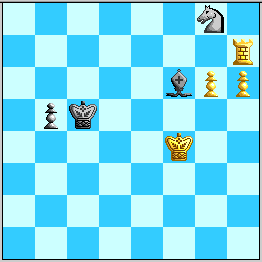
Fig. 11: Compared to 5. h6 in Fig. 6, what's the difference?
            D4321) 5...b4 6. Rf7! Nxh6 7. Rxf6 b3 8. Rf8 is in time.
            D4322) 5...Kd6 6. Rf7! and:
               D43221) 6...Nxh6 7. Rxf6+ +/-.
               D43222) 6...Be5+ 7. Kg5 Nxh6 8. Kxh6 b4 9. Rf5! and the
                       X-ray reveals that Black's King is cut off from
                       the b-pawn (9...b3 10. g7 Bxg7 11. Kxg7 Kc6 12. Rf3).
            D4323) 5...Ba1 6. Ra7! wins as in C333).
            D4324) 5...Bb2 6. Rc7+ Kd6 7. Rc2! and now:
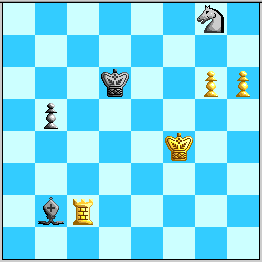
Fig. 12: White must keep up the tempo.
               D43241) 7...Ba1 8. h7 Ne7 9. Kg5 and now:
                  D432411) 9...b4 10. Rc4! corrals the pawn.
                  D432412) 9...Nxg6 10. Kxg6 and Black loses key time again
                           because of 10...b4 11. Rc4!
                  D432413) 9...Bg7 10. Rf2! and finally:
                     D4324131) 10...Ke6 11. Rf7 Ba1/b2/c3/d4 12. g7 Kxf7
                               13. h8=Q Bxg7 14. Qb8 wins the b-pawn and the
                               game (reaching a known computer-table win).
                     D4324132) 10...b4 11. Rf7 b3 12. Rxg7 b2 13. h8=Q b1=Q
                               14. Qd8+ is curtains.
                     D4324133) 10...Bc3 11. Rf6+! is efficient.
               D43242) 7...Be5+ (7...Bf6 8. Kf5+/-; 7...Bd4 8. EM+/-)
                       8. Kg5 Nxh6 9. Kxh6 and again Black is stymied
                       because 9...b4 10. Rc4! wins the pawn and
                       9...Kd5 10. Kg5! b4 11. Kf5! and now:
                  D432421) 11...b3 12. EM+ Bd4 13. g7+/-.
                  D432422) 11...Bc3 12. Rxc3! bxc3 13. g7+/-.
                  D432423) 11...Ba1 12. Ra2! Bg7/h8 13. Ra7/a8 B-moves
                           14. Rb7/b8 Kc4 15. Ke4 gets White's King within the
                           square, with a check on the c-file coming soon.

            But Black has one more option:
            D4325) 5...Bd4! and now:
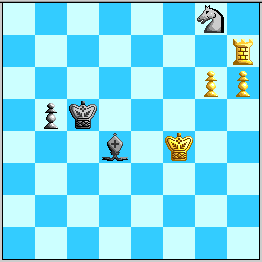
Fig. 13: How now for White?
               D43251) Try 6. Kg5? Kb4! is the simplest hold.  Black is
                       safe and White has nothing.
               D43252) Try 6. Rc7+ Kd6 7. h7 Ne7= as White is overextended.

               This leaves White only the following bang-bang line, with
               an attractive double-sacrifice on h7:

               D43253) 6. Ke4! Nf6+ 7. Kf5 Nxh7 8. g7! Nf6 9. h7! Nxh7
                       10. g8=Q Nf6, and we reach the key diagram:
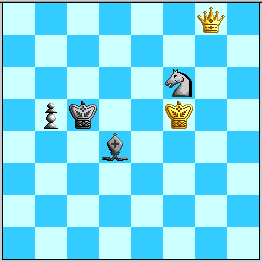
Fig. 14, White to move. Is this a win?
K4IT 6-man EGT Server (must enter position manually?)
The main line does exactly the opposite of what I was trying to do in my human+5-man EGTB analysis. While I found various ways to restrain Black's pawn from going further than b4, the quickest line forces it to go to b2 in a hurry!
11. Qf8+ Kc4 12. Qd6! (the silly Qg7 is a win in 76, so White does have substantial "slack" here) b4 13. Qc6+ Kd3 14. Qb5+ Kc3 15. Kf4! b3 16. Kf3! b2 17. Ke2! (wow!)
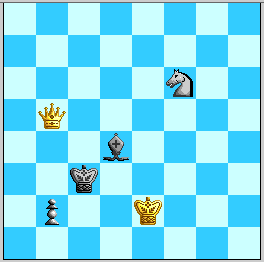
Fig. 15. Fearful symmetry on a diagonal.
17...Bg1 18. Qd3+ Kb4 19. Qd2+ Ka3 20. Qc3+ Ka2 21. Qc4+ Ka3 22. Qb5 Ne8 (22...Ka2 23 Qa4+ Kb1 24. Qc4! Ka1 25. Qa6+ wins the Knight) 23. Kd3 Nd6 24. Qa5+ Kb3 25. Qd5+ Ka4 26. Qa2+ wins the Pawn.
To be "fair" to me, I did believe the position after 10...Nf6 to be a win, as reflected by my putting in all the other effort... And there are quite a few other wins, apparently. 34 moves is pretty snappy compared to what you get if in Fig. 14 you move WK to h1 and WQ to h4---then Kg2 is mate in 121, while Qg5+ is markedly inferior giving mate in 122!