CSE 462/562: Database Systems (Spring 2022)
Project 1: Project sign-up and File I/O interface
Assigned: Tuesday, 2/1/2022
Project sign-up (lab0) due: Tuesday, 2/8/2022, 11:59 pm EST
Project (lab1) due: Tuesday, 2/15/2022, 11:59 pm EST
No write-up due
Grading break-down: RepoSetup (0.5%) + FSFile (4.5%)
Last updated: 1/26/2022
0. Project overview
In this course, you will work in teams of up to 2 people to build a mini database system Taco-DB in C++11. There are 5 projects throughout the semester, covering the various layers in Taco-DB from bottom up. Here's a list of the projects: storage (I/O, buffer manager, heap file), indexing (B-tree), query processing (relational operators, join, external sorting), and query optimization (access path selection, size estimation). These cover most of the topics we discussed in the lectures, with the exception of transaction processing, concurrency control and crash recovery due to time constraints. Each project except Project 1 will have a single submission deadline.
Working in a two-person team is only meant to reduce your workload in terms of coding rather than excusing you from working on any part of the projects. In other words, you will first need to come up with a design and implementation plan together with your teammate; clearly and fairly divide and/or coordinate your coding responsibilities; and finish your share of work responsibly. Remember, it is your team's code submission that gets graded, not each individual's. If you do not complete your share of task, your teammate will also lose the points for that.
In addition to that, each individual student will need to independently complete and submit a write-up for each project (except project 1), without sharing with or copying from your teammate. The write-up should include all a brief description of your solution and your division of coding responsibilities, as well as additional questions we may require you to answer. You will receive no points for the entire project (but not your teammate) if you do not submit the write-up on time.
You will need to set up a private repository on Github and grant us access to your repository to make submissions. We will use Autolab to pull your code and test it. Please refer to lab 0 below for details of how to set it up and how the grading works. The independently completed write-ups should be submitted to UBLearns, in PDF format by the project deadline + 2 days, unless otherwise posted. Note that you may not make any of your project code publicly available during or after this semester, or make them available priviately to any current or future students who may take the course. Please carefully review the academic integrity policy on the course homepage for more details.
In this project, your task is 1) lab0:
sign up for the project and set up your Github repository; and
2) lab 1: implement a simple File
interface based on Linux I/O syscalls. This project is less
relevant to Database, instead, the goal is to help you set up
your coding environment, and get familiar with C++ and Linux
programming if you were not. At the end of this project, you
should be familiar with Git and Github; be familiar with the
project codebase and the cmake build system; and
understand the semantics of the Linux I/O syscalls.
1. Lab 0 - Project sign-up
Your task is to set up a working repository and your build environment on your local machine or CSE student server. You'll complete the project sign-up by making a successful submission on Autolab - lab0.
Special instruction for lab 0: Each team only has to set up a single repository -- some of the steps below only have to be completed by one person in a team, while some of them need to be done by both.
You should also get familiar with basic shell and git operations, basic Github workflow as well as C++11 if not already. Here're a few good resources: POSIX shell, git, Github, C++11: here, and here
System requirements: You'll need a desktop or laptop with an x86-64 CPU and a reasonably recent Linux distribution installed. The code is tested on Ubuntu 20.04 (either bare machine or virtual machine, including Windows Subsystem for Linux 2) and Fedora 35. It may or may not compile on non-x86-64 or non-Linux systems, and even if it compiles, it may not function as intended (especially if you are using a laptop with ARM CPU such as Apple M1, Microsoft SQ1 or SQ2, and/or operating systems like Mac OS or Windows Win32).
For CSE students: if you do not have access to a
required system, you may remotely access these two CSE student
servers using SSH:
timberlake.cse.buffalo.edu and
metallica.cse.buffalo.edu. They are x86-64 systems
installed with CentOS-7, and configured with all the required
software packages (see alternative guides in lab 0).
However, they are shared among all CSE students, so you should
expect them to be slower and should not run any resource
intensive jobs on them.
For non-CSE students: if you do not have access to the CSE student servers and do not have access to a required system, please send a private message on Piazza as soon as possible.
The following is a list of software packages you need to install:
- git
- cmake (>= 3.13)
- pkg-config (>= 0.29, older ones work but are slower)
-
C11 and C++11 compliant compilers, e.g.,
- gcc and g++ (>= 7)
- or clang and clang++ (not tested)
- make
- autoconf
- bash as well as grep, sed, awk, etc.
- python3
The autograder and our final test server are both installed with Ubuntu 20.04 and gcc/g++ 9.3.
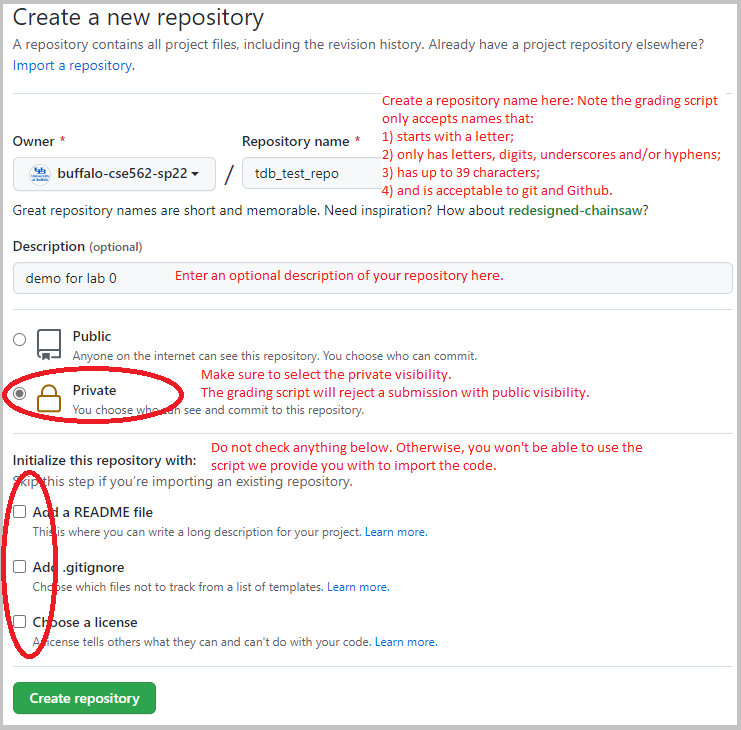
Step 1:
Create a private repository on Github
using your personal account. Follow the guides below.
Step 2:
Add buffalo-cse562-sp22 and your teammate's Github
user (if any) as collaborators in settings -> Manage
access -> Add people. Do not add anyone else as
collaborators. The grading script will reject the submission if
you have more than your group size + 1 collaborators (including
yourself).
Step 3:
Download the lab0.tar.xz tarball from
Autolab and put it in a place where you'd like to set up your
local Git repository. Then enter the following in a shell
(e.g., bash) with the <github-username> and
<repo-name> replaced with your actual Github
user name and repository names:
    # change into the directory where you put lab0.tar.gz
    cd <dir-where-you-put-lab0.tar.gz>
    # extract the tarball
    tar xf lab0.tar.xz
    # rename the extracted directory to the same as your repository
    mv lab0 <repo-name>
    # change into the directory
    cd <repo-name>
    # setting up the git repo
    ./setup_repo.sh git@github.com:<github-username>/<repo-name>
If everything goes well, the script will print Repo setup
is finished. Here are a few post-setup steps to
follow:... Please follow the post-setup steps.
Your teammate should also be able to clone the repository with the imported code and follow the remaining steps at this time.
Step 4: Build the code.
We use cmake as the build system. Most likely you
will not need to modify any of the CMakeLists.txt,
but you should know how to invoke the cmake.
Here's how to create a debug build in the build
directory:
    cd <dir-to-local-repository>
    cmake -B build . # don't miss the dot at the end or cmake will report errors
    cd build
    make
The first build will also build a few dependencies in external/
directory:
Abeisl,
GoogleTest,
Jemalloc.
Future builds will be faster as long as you do not remove the
external/ directory locally. You don't have to run
cmake again in future build either -- just run
make in the build/ directory.
Alternative guides for those who are using CSE student
servers: you should use the following command instead
to configure the cmake build diretory because the default
toolchain on timberlake and metallica
won't work:
cmake -B build -DCMAKE_C_COMPILER=/util/gcc-7.2.0/bin/gcc -DCMAKE_CXX_COMPILER=/util/gcc-7.2.0/bin/g++ -DPKG_CONFIG_EXECUTABLE=/util/pkg-config-0.29.2/bin/pkg-config .
Step 5: Run the tests locally with ctest (which comes with cmake):
    cd build
    ctest -V
There is only one test in lab 0:
BasicTestRepoCompilesAndRuns.TestShouldAlwaysSucceed,
which, as its name suggests, should always succeed without
modifying any source code.
Alternative guides for those who are using CSE student
servers: you need to add
/util/gcc-7.2.0/lib64 to the
LD_LIBRARY_PATH environment variable for the
dynamic link loader to locate the newer version of glibc. If
you're using the default tcsh and never configured
your rc file, you may do so by finding and replacing these
lines in your ${HOME}/.cshrc:
if (! $?LD_LIBRARY_PATH) then
    setenv LD_LIBRARY_PATH /extra
else
    setenv LD_LIBRARY_PATH ${LD_LIBRARY_PATH}:/extra
endif
with the following:
if (! $?LD_LIBRARY_PATH) then
    setenv LD_LIBRARY_PATH /util/gcc-7.2.0/lib64
else
    setenv LD_LIBRARY_PATH /util/gcc-7.2.0/lib64:${LD_LIBRARY_PATH}
endif
Step 6: Make a submission for lab 0 on Autolab. We will only count the last submission made on Autolab by each team as your final submission. Later on, the final submission is the code we'll test offline on a different server.
Before you submit anything, you might want to click on the
We disabled group options in Autolab due to a technical issue
with system. You are still working in teams, but your
teammate's submission and grade is not visible to you. Please
coordinate with each other in private. That said, your
teammate's code submission still count towards yours and your
final grade for the coding component will be based on the last
submission made by your group, even if you don't have a grade
on your gradebook (on Autolab).
Group options tab and invite your teammate to form
a group. Both of you will be able to see all your submissions
once your teammate accepts the invitation. You might need to
recreate the group for every project in Autolab. This has no
effect on your grade even if you don't create the group as we
will keep track of the team members using the lab 0 submission
form below.
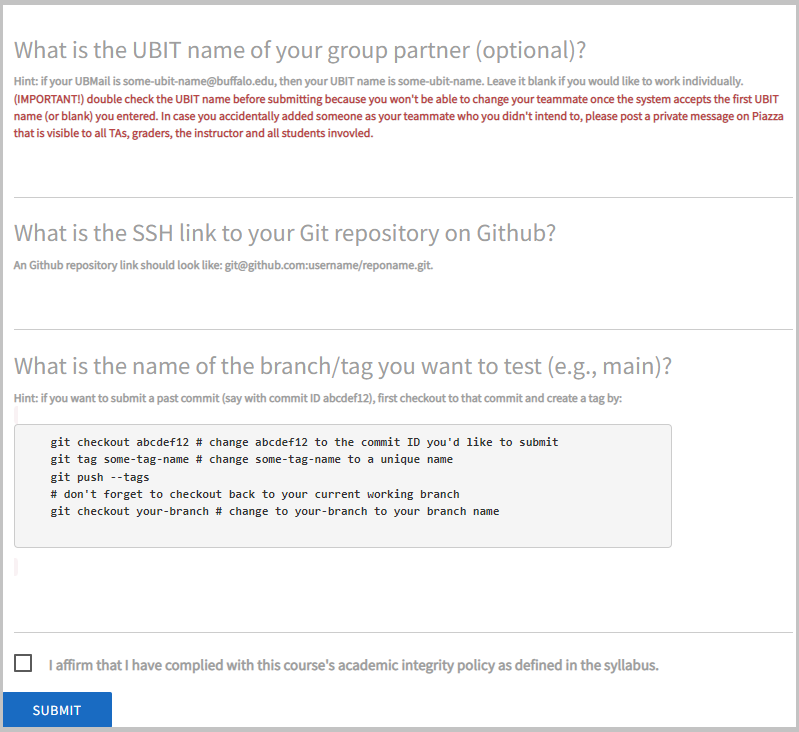
To make a submission, fill in the form (shown below) with your
teammate's UBIT name (or leave it empty if
you'd like to work individually) and your repository
information, and then click submit. If you're not sure what
your or your teammate's UBIT name is, that is the username part
in your @buffalo.edu email address (e.g., your
UBIT name is xxxx, if your email address is xxxx@buffalo.edu).
Our submission system on our offline test server will reject
any UBIT name it does not recognize, but once it accepts the
UBIT name, you'll have to contact the TAs and the instructor to
make changes. You can make as many submissions as you need to
in order to correct your repository settings (though we do
enforce a maximum submission rate of 10 submissions per hour
per team).
For students who enrolled close to or after the add/drop
deadline, please send a private message on Piazza under
requests folder to all TAs and the instructor to manually add
your UBIT name to our backend server, before you can submit lab
0. There's no late penalty for that, but you won't be able to
submit later projects without lab 0 successfully submitted.
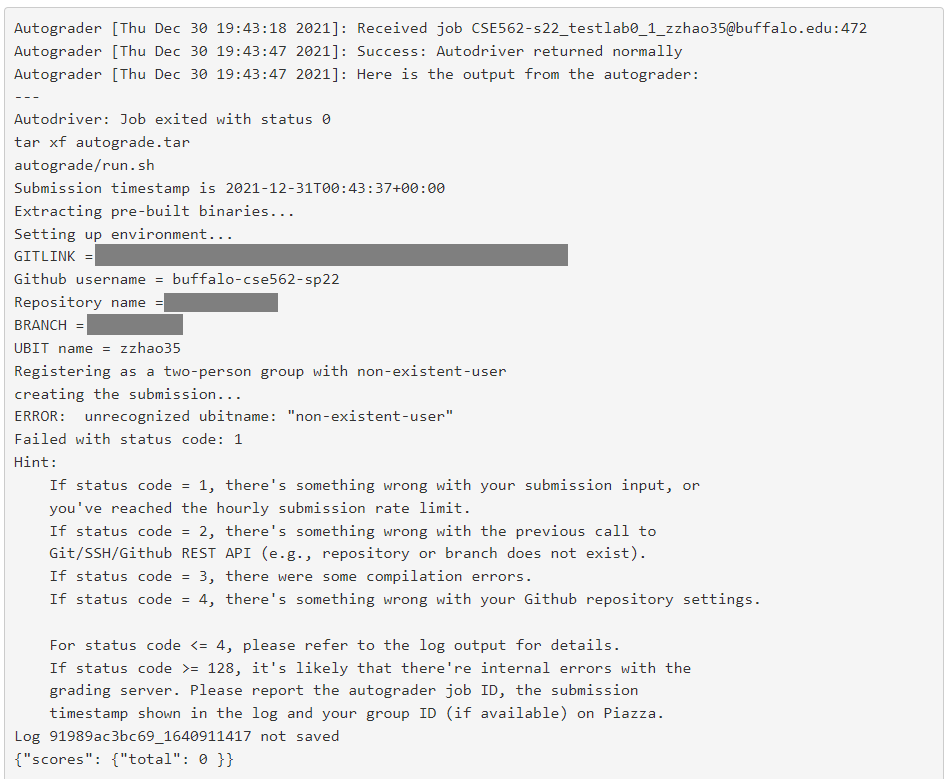
If your did not receive the full score, you may click on the
score to check its output log in order to identify issues.
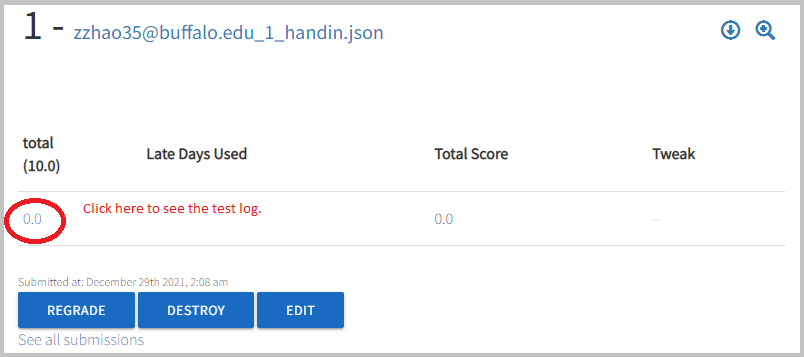
And the test log for a failed submission should contain enough
information for debugging (similar to below).
You may change your repository link until the deadline of lab 0 but do not enter any repository link that do not belong to your team! You won't be able to change the repository link once the deadline of lab 0 passes. We may keep a log of all the submissions you have made, and submitting a repository link that does not belong to your team is an AI violation.
2. lab 1 - File Interface
This is supposed to be a easy lab that walks you through of the process of importing new files into the repository, building, testing, debugging, and submitting the labs. We will also provide a bit more detailed instructions than later labs.
Importing supplemental files into your repository:
Download lab1.tar.xz and extract its content
in your local repository root using tar xf. Then
run the script lab1/import_supplemental_files.sh.
If it is successful, you will see an output similar to below:
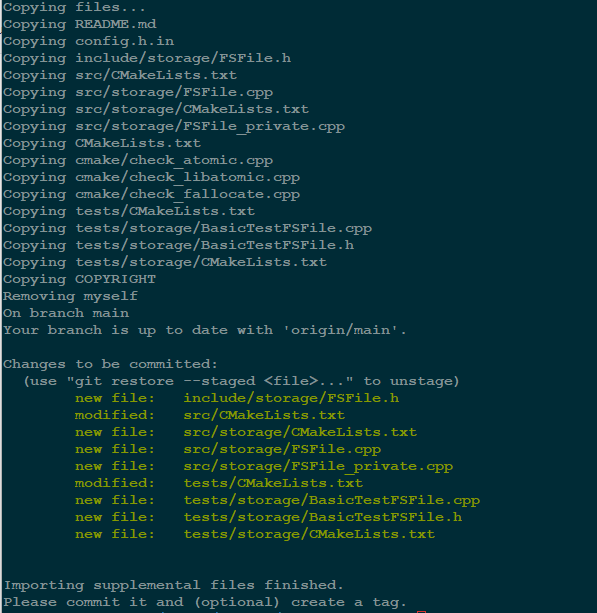
The code should successfully build at the moment but none of
the new tests should pass. We recommend that you make a new
branch for each lab using git branch
<branch-name> and/or create a tag git tag
<branch-name> for the starting point,
in case you need to revert back to an earlier point. At this
point, you may commit and push the new code to Github using
git push. If you made a tag, you'll additionally
call git push --tags as well.
Task: Use the Linux I/O syscalls (e.g.,
open(2), close(2),
pread(2), pwrite(2), etc.) to
implement the FSFile class in
src/storage/FSFile.cpp and
include/storage/FSFile.h. See the header and source
file for requirements and hints.
Note: you may ignore all thread-safety related requirements,
since we will be building a single-threaded database.
Testing and debugging: For lab 1, there are 14 basic
tests BasicTestFSFile.XXX defined in
tests/storage/BasicTestFSFile.cpp and another 14
basic tests BasicTestFSFile.XXXNoFallocate with an additional
--test_never_call_fallocate argument. The NoFallocate
variants test the fallback implementation of
FSFile::Allocate() when fallocate(2)
is not supported by your OS or file system. Your implementation
should pass each of these 28 tests within tens of milliseconds.
There are also 2 hidden system tests
SystemTestFSFile.TestAllocateLarge and
SystemTestFSFile.TestAllocateLargeNoFallocate,
which are not visible to you and you can only see the result of
these tests when you submit the code to Autolab. In later labs,
the hidden tests are those that are more complex, runs on a
larger data and/or have a longer running time that are likely
to fail on Autolab -- we will test all the test cases offline
after the deadline and take the higher score in the Autolab
test and the offline test for each of the test cases.
Nevertheless, they should not fail as long as your
code was implemented per specification.
You may use ctest -V to run all the tests as in
the previous lab. Alternatively, you may test and/or debug an
individual test by invoking its binary directly. For instance,
the following shows how to test
BasicTestFSFile.TestCreateFile:
    cd build
    # to test BasicTestFSFile.TestCreateFile
    ./tests/storage/BasicTestFSFile --gtest_filter=BasicTestFSFile.TestCreateFile
    # to list more options
    ./tests/storage/BasicTestFSFile --help
You may debug your code using GDB and/or log messages. We
provide a LOG() macro which you can use to print
any messages in your code (see
include/base/logging.h for details). As a concrete
example, you may use the following code to print the value of a
variable x:
    int x = 0;
    // do something with x
    LOG(kInfo, "the value of x is %d", x);
Note that the log messages are all disabled by default in the
tests, because we do not want to see too many log messages when
we are expecting errors in the function calls during tests. To
enable the log messages, run the test with an additional
--disable_logs=false argument, e.g.,
    cd build
    # run BasicTestFSFile.TestCreateFile with log enabled
    ./tests/storage/BasicTestFSFile --disable_logs=false --gtest_filter=BasicTestFSFile.TestCreateFile
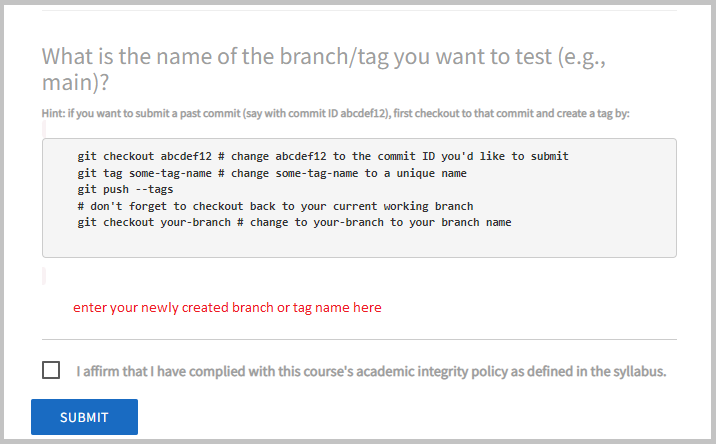
Submitting your code: Starting from lab 1, you only need to provide a branch or a tag name that references the git commit you want to test. Suppose you have tested your implementation locally, and want to test the latest commit, you may do the following to create a tag:
    git commit -a
    git push
    git tag <some-tag-name>
    git push --tags
Then make a submission at the lab 1 assessment page on Autolab
with the tag name: