CSE 462/562: Database Systems (Fall 2024)
Project 1: POSIX I/O interface
Released: Monday, 9/3/2024
Project due: Monday, 9/9/2024, 23:59:59 EDT
Last updated: 8/29/2024
1. lab 1 - File Interface
This is supposed to be a easy lab that walks you through of the process of importing new files into the repository, building, testing, debugging, and submitting the labs. We will also provide a bit more detailed instructions than later labs.
Creating a new branch: we recommend creating a new
branch for every project. For instance, you may create a new
branch named lab1 using the following command: git
checkout -b lab1.
Importing supplemental files into your repository:
Extract /ro-data/labs/lab1.tar.xz in
your local repository root on the student server and import the code:
    cd <dir-to-local-repository>
    tar xf /ro-data/labs/lab1.tar.xz
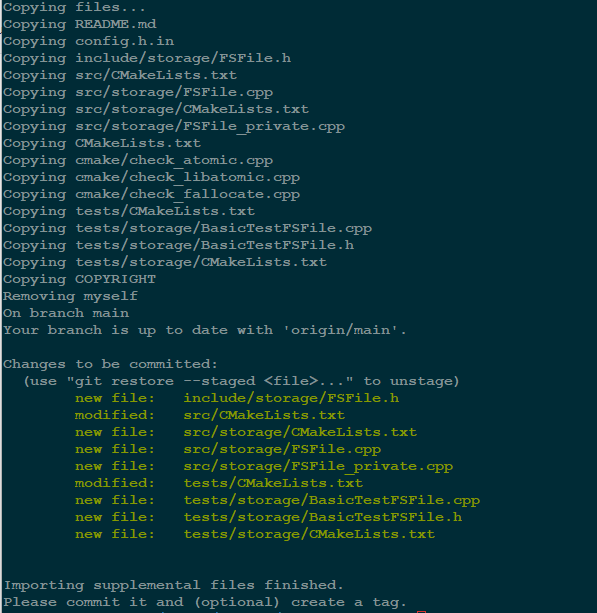
    ./import_supplemental_files.sh
If it is successful, you will see an output similar to below:

The code should successfully build at the moment but none of
the new tests should pass. We recommend making a tag after
successfully importing the files for each project so that you
will be able to compare your changes against the starting
point. For instance, you may create a tag named
lab1_initial using the following command:
git tag lab1_initial and push it to remote using
git push --tags.
Task: Use the Linux I/O syscalls (e.g.,
open(2), close(2),
pread(2), pwrite(2), etc.) to
implement the FSFile class in
src/storage/FSFile.cpp and
include/storage/FSFile.h. See the header and source
file for requirements and hints.
Note: you may ignore all thread-safety related requirements,
since we will be building a single-threaded database.
Testing and debugging: For lab 1, there are 14 basic
tests BasicTestFSFile.XXX defined in
tests/storage/BasicTestFSFile.cpp and another 14
basic tests BasicTestFSFile.XXXNoFallocate with an additional
--test_never_call_fallocate argument. The NoFallocate
variants test the fallback implementation of
FSFile::Allocate() when fallocate(2)
is not supported by your OS or file system. Your implementation
should pass each of these 28 tests within tens of milliseconds.
There are also 2 hidden system tests
SystemTestFSFile.TestAllocateLarge and
SystemTestFSFile.TestAllocateLargeNoFallocate,
which are not visible to you. You will see the result of
these system tests when you submit the code to Autolab. In
later labs, the hidden tests are those that are more complex,
run on a larger data and/or have a longer running time that
are likely to fail on Autolab -- we will test all the test
cases offline after the deadline and take the higher score in
the Autolab test and the offline test for each of the test
cases. Nevertheless, they should not fail as long as your code
is implemented per specification.
You may use ctest -V to run all the tests as in
the previous lab. Alternatively, you may test and/or debug an
individual test by invoking its binary directly. For instance,
the following shows how to test
BasicTestFSFile.TestCreateFile:
    cd build.Debug
    # to test BasicTestFSFile.TestCreateFile
    ./tests/storage/BasicTestFSFile --gtest_filter=BasicTestFSFile.TestCreateFile
    # to list more options
    ./tests/storage/BasicTestFSFile --help
You may debug your code using GDB or log messages. We
provide a LOG() macro which you can use to print
any messages in your code (see
include/base/logging.h for details). As a concrete
example, you may use the following code to print the value of a
variable x:
    int x = 0;
    // do something with x
    LOG(kInfo, "the value of x is %d", x);
The LOG() macro also throws an exception to
indicate errors if you pass kError or
kFatal as the first argument. You will find
examples in this project.
Note that the log messages are not printed in the tests by
default, because we do not want to print excessive log messages
when we are expecting errors in the function calls during
tests. To enable log message printing, run the test with an
additional --disable_logs=false argument.
    # assuming current working directory is build.Debug or build.Release
    # run BasicTestFSFile.TestCreateFile with log enabled
    ./tests/storage/BasicTestFSFile --disable_logs=false --gtest_filter=BasicTestFSFile.TestCreateFile
Submitting your code: Starting from lab 1, you only need to provide a tag name that references the git commit you want to test. Suppose you have tested your implementation locally, and want to test the latest commit, you may do the following to create a tag:
    git commit -a
    git push
    git tag <some-tag-name>
    git push --tags
Then you may make a submission with the tag name using the submit script :
submit test 1 <git-commit-id-or-tag-name>
As in project 0, you may use submit list-subs 1 to list your submissions,
and submit list-sub-details 1 <seqno> to obtain details
of the submission and testing results.