CSE 462/562: Database Systems (Spring 2024)
Project 1: Project sign-up and File I/O interface
Released: Monday, 1/29/2024
Project sign-up due (lab0): Thursday, 2/1/2024, 23:59:00 EST (no grace period allowed!)
Project due (lab1): Sunday, 2/4/2024, 23:59:00 EST (submission will be enabled on 2/2/2024)
Last updated: 1/25/2024
0. Project overview
In this course, you will work in teams of up to 2 people to build a mini database system Taco-DB in C++17. There are 5 subprojects throughout the semester, covering the various layers in Taco-DB from database storage to query processing layers, including storage (I/O, buffer manager, data layout and heap file), indexing (B-tree), query processing (relational operators, join, external sorting), and query optimization (manually optimize a query plan). These cover most of the topics we will discuss in the lectures, with the exception of transaction processing, concurrency control and crash recovery due to time constraints. All projects are due at 23:59:00 Eastern Time.
Late submission policy: you have up to 3 grace days in total for projects and written assignments, and you may only use at most 1 grace day for each project or written assignment. There is no penalty for late submissions that fall into the allowed grace days. No credit will be given if you make a late submission that uses more than allowed grace days. If you have a project teammate and any of you make a late submission, any grace days used will count towards the used grace days for both team members.
Working in a two-person team is only meant to reduce your workload in terms of coding rather than releasing you from working on the designs. In other words, you will first need to come up with a design and implementation plan together with your teammate; clearly and fairly divide and/or coordinate your coding responsibilities; and finish your share of work responsibly. Remember, it is your team's code submission that gets graded, not each individual's. If you do not complete your share of task, your teammate will also lose the points for that.
You will need to set up a private repository on Github, shared with your teammate if any, and grant us access to your repository to make submissions. We will use Autolab to pull your code and test it. Please refer to lab 0 below for details of how to set it up and how the grading works. Note that you may not make any of your project code publicly available during or after this semester, or make them available priviately to any current or future students who may take the course. Please take some time to review the academic integrity policy on the course homepage for more details.
[Policy for dissolving a team] In the rare cases if you want to dissolve your team or your teammate has dropped/resigned from the course, you are allowed to do so only if
- both team members need to post a private message on Piazza to notify us of your decision within 48 hours of any project deadline (23:59:00 on due date + 2);
- the team member who is not the repository owner needs to make a local clone of your repository as of the due date, and push it to a new private repository;
- the repoistory owner has to remove the other team member from the collaborator list.
Upon dissolving a team, you will be working in a single-person team for the rest of the semester and will not be allowed to form a new team.
In this project, your task is 1) lab0:
sign up for the project and set up your Github repository; and
2) lab 1: implement a simple File
interface based on Linux I/O syscalls. This project is less
relevant to Database Systems. Instead, the goal is to help you
set up your coding environment, and get familiar with C++ and
Linux programming if you are not already. At the end of this
project, you should be familiar with Git and Github; be
familiar with the project codebase and the cmake
build system; be comfortable with looking up documentation; and
understand the semantics of the Linux I/O syscalls.
1. Lab 0 - Project sign-up
Your task is to set up a working repository and your build environment. You'll complete the project sign-up by making a successful submission on Autolab - lab0.
Special instruction for lab 0: Each team only has to set up a single repository and import the code once (Steps 1, 2).
Prerequisites: you should get familiar with basic shell
and git operations, basic Github workflow as well as C++11, 14
and 17 if not already.
Here're a few good resources. (You may go over them as needed. No need to go over all of them).
POSIX shell,
git,
Github,
C++11, 14, 17:
ISOCPP FAQ on C++11 and C++14,
and
cppreference wiki on C++11,
C++14, and
C++17.
The following instruction assumes that you will connect to the
dedicated CSE student server for CSE 562
(minsky.cse.buffalo.edu) remotely. The server
have been preconfigured with all the required tools and
libraries.
We will show you how to set up your build environment using
Visual Studio Code (VSCode),
a free and open-source source code editor with support for
development operations like debugging and version control.
If you run into issues with VSCode, please review the FAQ post on Piazza first before posting
a new question. You may also connect to these servers using SSH on
command line if you prefer, and most of the instructions still
apply.
Step 1: Create a private repository on Github using your personal account. Follow the guides below.

Step 2:
Add ub-cse562-sp24 and your teammate's Github
user (if any) as collaborators in settings -> Manage
access -> Add people. Do not add anyone else as
collaborators. The grading script will reject the submission if
you have more than your group size + 1 collaborators (including
yourself). Your invitation to ub-cse562-sp24
will be accepted within 5 to 10 minutes automatically.
Step 3: If you are connecting from off campus, you have to connect to UB VPN in order to connect to the student servers. See here for how to install and setup UB VPN. Once you're connected, you may continue to step 4.
Ignore this step if you are connected to eduroam or UB_Secure.
Step 4: Download and install VSCode. If you do not have a supported system, skip this step and continue with a command-line terminal.
Step 5: Installing OpenSSH Client.
If your system is installed with Windows 10/11, please enable
the OpenSSH client feature in Settings -> Apps ->
Optional Features. If your system is installed with
Mac/Linux, please make sure OpenSSH is installed (usually
already pre-installed or available from the default package
manager).
To verify if you have successfully installed it, open a
terminal (PowerShell on windows) and type ssh. It
will print its usage if it is installed.
(Hint: You may also open a terminal in VSCode: Terminal (menu) -> New Terminal).
Step 6: Generating SSH key and installing your public key on the CSE student server. This will allow you to connect to the student servers without having to enter your password.
Before you continue, please check whether you already have an
SSH key and/or installed it on any of the CSE student servers.
To do so:
- Check if there are key files (e.g.,
id_rsa.pub,id_ecdsa.puborid_ed25519.pub) at the default location (for Windows: open file explorer and enter%USERPROFILE%\.sshin the address box; for Linux/Mac: enter `ls -al ~/.ssh` in terminal). If the default.sshdirectory does not exist or there is no such key file, you probably have not generated a key before and please continue with Step 6a. Otherwise, check 2. -
In a terminal, run
ssh
                            <your-ubit-name>@minsky.cse.buffalo.edu
( replace<your-ubit-name>with your UBITName, i.e., the user name of your UBMail address). If you can log into the server without having to enter a password, you probably have already installed your public key on the student servers. In that case, please skip this step and continue with Step 7. Otherwise, continue with Step 6b.
(Hint: enterexitorCtrl-D(on Windows/Linux) exit the remote server if you successfully logged in.)
Step 6a: Generating SSH key. In your terminal, enter
ssh-keygen. Follow the prompt and press enter for
a few times to create an SSH key at the default location with
no passphrase. Never share your private key file
(id_rsa) with anyone.
Step 6b: Installing SSH key on student server. Open a terminal.
For Windows, please copy and paste the following line, with <your-user-name> replaced with
your actual UBITName (i.e., the user name of your UBMail address), and then enter your UBIT password.
cat "${env:USERPROFILE}\.ssh\id_rsa.pub" | ssh <your-ubit-name>@minsky.cse.buffalo.edu "[ ! -d ~/.ssh ] && mkdir -m 700 ~/.ssh; [ ! -e ~/.ssh/authorized_keys ] && touch ~/.ssh/authorized_keys && chmod 600 ~/.ssh/authorized_keys; cat - | tr -d '\r' >> ~/.ssh/authorized_keys"
For Linux/Mac, please copy and paste the following line, with <your-user-name> replaced with
your actual UBITName (i.e., the user name of your UBMail address), and then enter your UBIT password.
ssh-copy-id <your-ubit-name>@minsky.cse.buffalo.edu
At this point, you should be able to log into any of the student servers (minsky.cse.buffalo.edu) using SSH without password.
Step 7: configure SSH connection in VSCode.
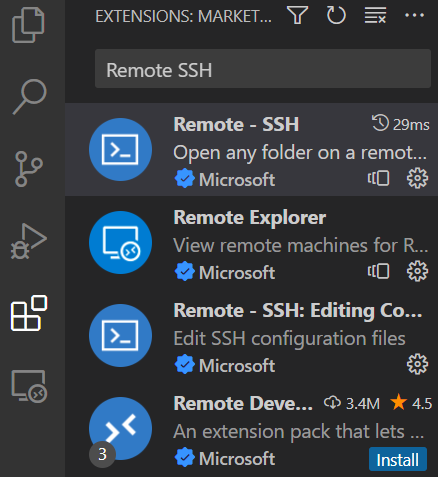
The first step is to install the Remote SSH extension. Please click on the extesion button on the left toolbar, search
for Remote SSH and click install.
You may now add both student servers as new SSH Hosts. To do
so, open the Command Palette by clicking Help menu ->
Show All Commands, or use the shortcut by press
Ctrl + Shift + p or F1 (for Mac,
Cmd + Shift + p or F1). You will find
a textbox showing up at the top of the window. This textbox
allows you to search for commands using substrings. Please
search for Remote-SSH: Add New SSH Host... and
follow the prompts. When it asks you to choose an SSH configuration
file, please choose the one in the default location (for
Windows:
C:\Users\your-local-user-name\.ssh\config; for
Linux/Mac:
/home/your-local-user-name/.ssh/config).


You may now connect to either one of the two servers now by opening
the command palette, searching for Remote-SSH: Connect to Host...,
selecting any one of the servers. That will open up a new window with the
lower-left corner now showing:
 .
.
You may close the
previous window now.
(Note: it might take a few seconds on your first connection
to setting up the host. It may ask you the type of system
-- please choose Linux.).
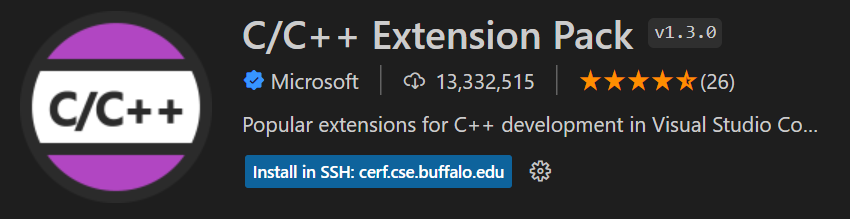
One last step for configuring VSCode is to install the
C/C++ extension pack on the remote server. Click the
extension button on the left bar as before, search for
C/C++ Extension Pack and click install in
SSH:hostname.
Step 8: set up your code repository.
First step is to ensure that you have generated an SSH key pair
on the student server (not the one on your local machine
in Step 6) and uploaded the public key to Github. You should check if you have
~/.ssh/id_rsa in a terminal on the student server.
If not, run ssh-keygen to generate the keys. Then
cat ~/.ssh/id_rsa.pub to print the public key.
Finally, copy it and upload it in Github -> SSH
and GPG keys -> New SSH Key.
Next, open a terminal
(you may do so in VSCode by entering Ctrl + Shift +
` or through the Terminal menu).
For the repository owner: enter the following with the
<github-username> and
<repo-name> replaced with your actual Github
user name and repository name (skip the comment lines that
starts with #):
    # extract the tarball
    tar xf /local/Spring_2024/cse562/lab0.tar.xz
    # rename the extracted directory to the same as your repository
    mv lab0 <repo-name>
    # change into the directory
    cd <repo-name>
    # setting up the git repo
    ./setup_repo.sh git@github.com:<github-username>/<repo-name>
If everything goes well, the script will print Repo setup
is finished. Here are a few post-setup steps to
follow:... Please follow the post-setup steps.
A common reason the repo setup fails to complete is you have not set your name and email for Git. The post-setup steps will let you know in that case and provide hints for how to continue.
For the teammate of the repository owner:
At this point, you should also be able to clone the
repository with the imported code into their own home directory
on the student server and follow the remaining steps. You may
do so by enter git clone
git@github.com:<github-username>/<repo-name>
at your home directory in a terminal, with
<github-username> replaced with the
repository owner's Github user name and
<repo-name> with your Github repository name.
For both team members: you should be able to open the
your repository directory in VSCode using the Open Folder
button
or File menu -> Open Folder. VSCode might ask
you whether to trust the authors of the directory and you need to
select "yes".
Once you open the folder, you need to select the GCC/G++ 9.4.0
as the tool kit for cmake. To do so, you may click the Tool Kit
button at the bottom  , or open the command palette and search
for
, or open the command palette and search
for CMake: Select a Kit. Then select GCC 9.4.0 x86_64-linux-gnu
from the drop-down menu.
You have finished with all the one-time setups now.
Step 9: build the code.
We use cmake as the build system. You do not need
to modify any of the CMakeLists.txt in most cases,
but you should be generally aware of how cmake
works. If you are not using
VSCode, please skip the "for VSCode users" part.
Step 9 for VSCode users:
The default build type is Debug, which allows you to debug
your code with GDB within VSCode or from command line, but the
program will run slower because compiler optimization is
disabled. To test programs in Release build type, which is how
Autograder and our offline test server will test your code, select
a build type by either clicking on this button
 at the bottom,
or opening the command palette and search for
at the bottom,
or opening the command palette and search for CMake: Select Variant.
You may need to switch back and forth frequently throughout the
project.
To build the code, you may click the Build button
 at the bottom, or enter
 Ctrl + Shift + b (for Mac,
Cmd + Shift +b). In most cases, you should select
the CMake: build task from the drop-down menu to
perform a incremental build (faster). In rare cases, you may
want to select CMake: clean rebuild in case the
build system ends up in a strange state (e.g., linking
failures, new code not running in the build but incremental
build refuses to compile the source code again).
Step 9 for command line users:
here's how to create a Debug build in the build
directory:
    cd <dir-to-local-repository>
    cmake -B build.Debug . # don't omit the dot at the end or cmake will report errors
    cd build.Debug
    make -j 8        # -j 8 enables parallel build with up to 8 processes
                     # Please be considerate for all CSE students who are
                     # sharing these servers and refrain from using -j with
                     # too many processes.
And here's how to create a Release build in the build
directory:
    cd <dir-to-local-repository>
    cmake -B build.Release -DCMAKE_BUILD_TYPE=Release . # don't omit the dot at the end or cmake will report errors
    cd build.Release
    make -j 8        # -j 8 enables parallel build with up to 8 processes
                     # Please be considerate for all CSE students who are
                     # sharing these servers and refrain from using -j with
                     # too many processes.
Step 10: Running tests locally with ctest.
Again, you should be aware of how ctest works and it is worthwhile
to read the "for command line users" part even if you are using VSCode.
If you are not using VSCode, please skip the "for VSCode users" part.
(Note: the tests are implemented using the
GoogleTest
framework. Going through the GoogleTest Primer section in its
user's guide will help you understand the test cases and allow
you to write your own test cases in later projects).
Step 10 for VSCode users: To run all tests, click the
ctest button at the bottom
 ,
or open the command palette and search for
,
or open the command palette and search for CMake: Run Tests.
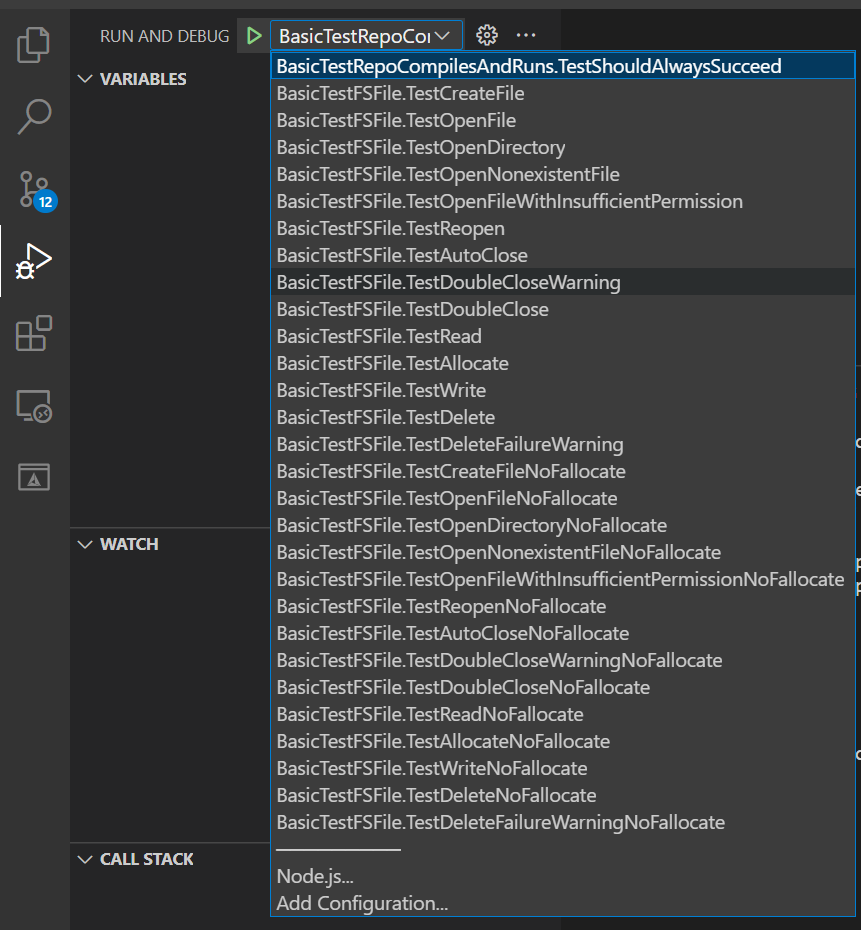
To run an individual test case, click the Run and Debug button
on the left  ,
or enter
,
or enter Ctrl + Alt + d (for Mac, Cmd + Alt + d) to open the
Run panel. From the drop-down menu at the top, select the test case that
you want to run or debug (see below). Then you may start running the program
without debugging by clicking Run ->> Run without Debugging,
or enter Ctrl + F5 (for Mac, Cmd + F5).
You may also debug the test case
by clicking Run ->> Start Debugging ,
or enter F5 (for Mac, F5).
(hint: for some laptops, you also need to press Fn to activate
the Function keys.)
(hint 2: you should set a breakpoint in the corresponding test body in order
for the debugger to pause execution. Please refer to
this tutorial
for how to debug in VSCode if you're not familiar with that.)
For command line users:
The following assumes that you have changed the working directory
into either build.Debug or build.Release.
- Run all tests:
ctest(add-Vto see verbose outputs). - Find all test cases without running them:
ctest -N - Run a specific test case (e.g.,
BasicTestRepoCompilesAndRuns.TestShouldAlwaysSucceed):ctest -R "BasicTestRepoCompilesAndRuns.TestShouldAlwaysSucceed", or./tests/BasicTestRepoCompilesAndRuns --gtest_filter="BasicTestCompilesAdnRuns.TestShouldAlwaysSucceed"
- (hint 1: you may pass
--helptoctestor individual test programs to find other useful flags) - (hint 2: to use GDB to debug a specific test case, you must use the Debug build.
There is only one test in lab 0:
BasicTestRepoCompilesAndRuns.TestShouldAlwaysSucceed,
which, as its name suggests, should always succeed without
any source code modified.
Step 11: Make a submission for lab 0 on Autolab. We will only count the last submission made on Autolab by each team as your final submission. Later on, the final submission is the code we'll test offline on a different server.
You should first create a group in Project 1 - Lab 0:
Project Sign-Up -> Group options. Once you have
created a group, the other student in the group need to accept
the group request. Note that once you form a group and
have made your first successful submission to lab 0, you will
not be able to change your team member without contacting the
instructor/TA for help (see below for details).
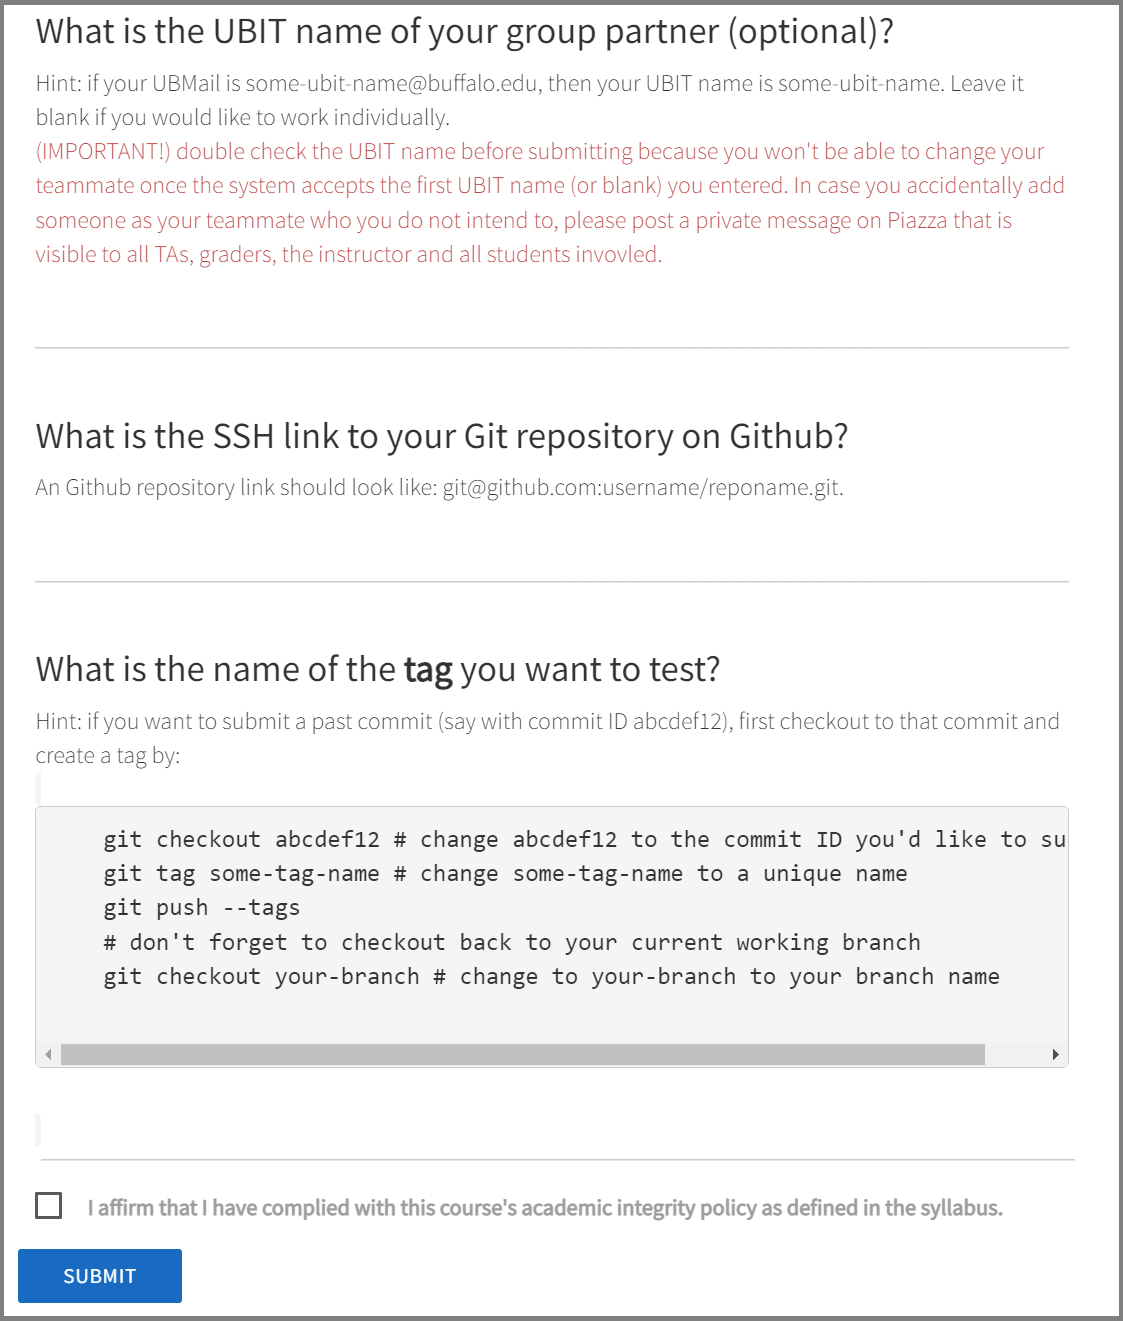
To make a submission, fill in the form (shown below) with your
teammate's UBIT name (or leave it empty if
you'd like to work individually) and your repository
information, and then click submit. If you're not sure what
your or your teammate's UBIT name is, that is the username part
in your @buffalo.edu email address (e.g., your
UBIT name is xxxx, if your email address is xxxx@buffalo.edu).
Our submission system on our offline test server will reject
any UBIT name it does not recognize, but once it accepts the
UBIT name, you'll have to contact the TAs and the instructor to
make changes. You can make as many submissions as you need to
in order to correct your repository settings (though we do
enforce a maximum submission rate of 10 submissions per hour
per team).
For students who enrolled after the first day of lecture and have no access to the system, please send a private message on Piazza to all TAs and the instructor for help.
You may click on the
score to check its output log.
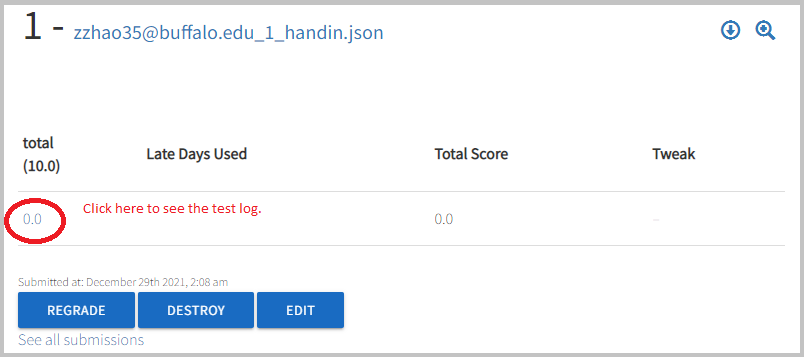
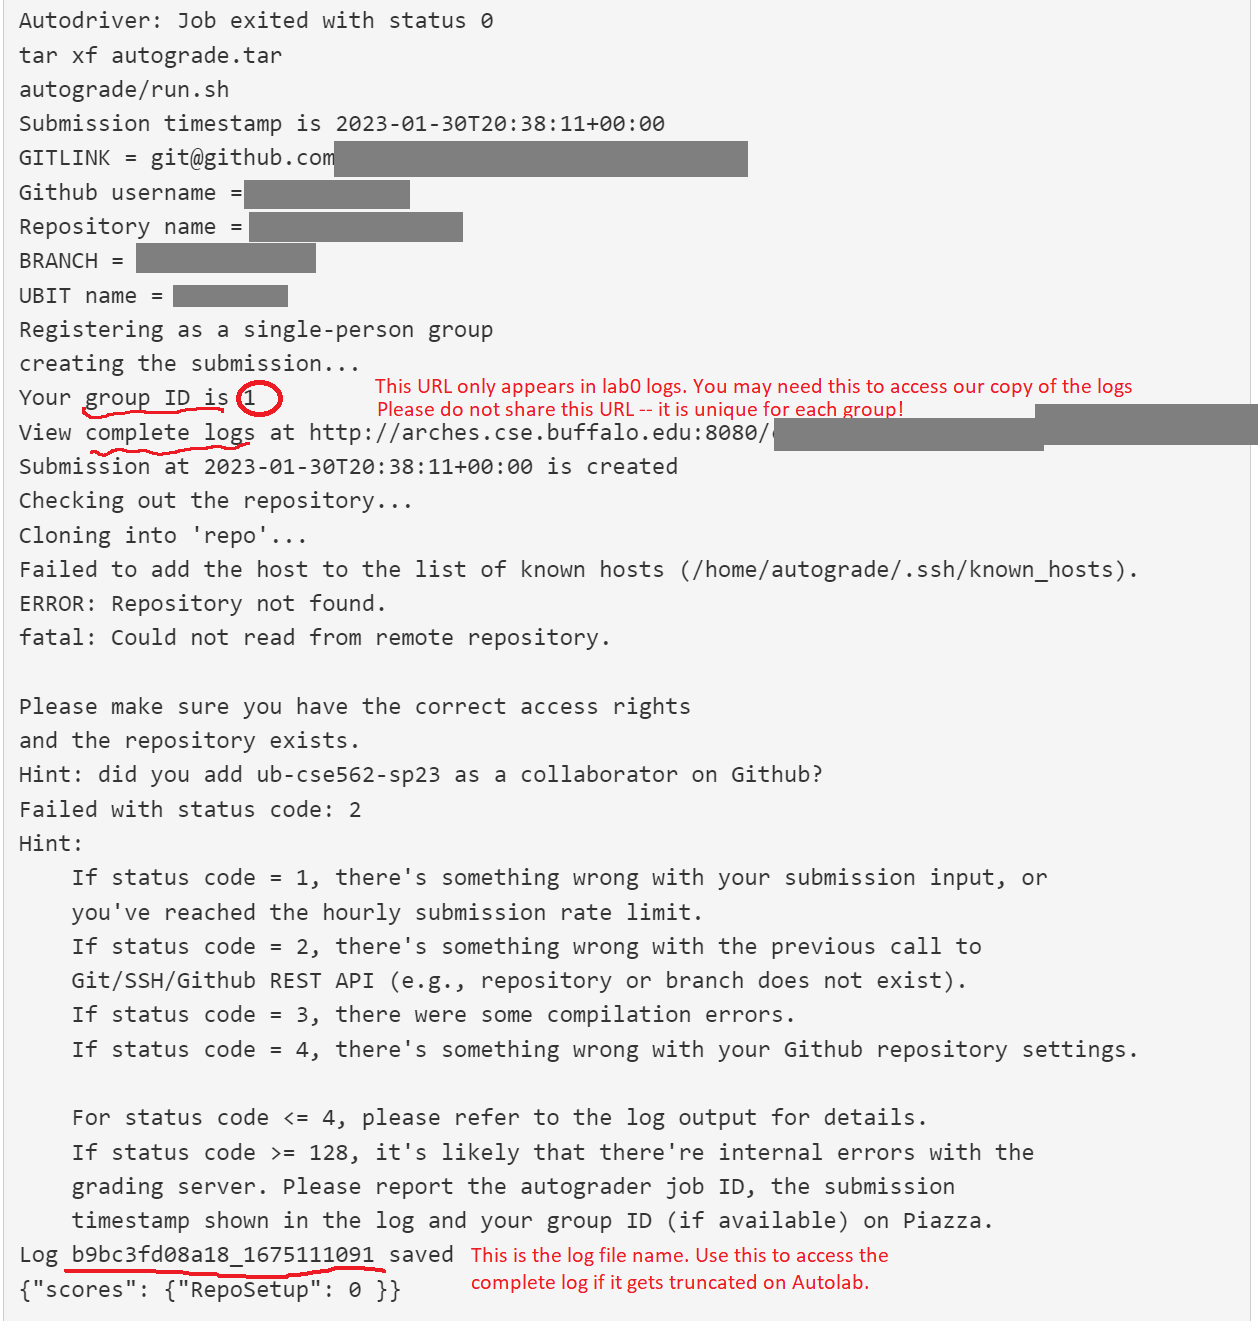
And the test log for a failed submission should contain enough information for debugging (similar to below).
For this lab, you should also find your group ID
and the URL of the complete logs in case Autolab truncates your
log because it's too long.
(Note: we may still truncate your log if it exceeds 1MB in size)
(Note 2: each group has a uniquely generated random hash in the
complete log URL. Please do not share it with other groups.)
You may change your repository link until the deadline of project 1 but do not enter any repository link that do not belong to your team! You won't be able to change the repository link once the deadline of project 1 passes. We will keep a log of all the submissions you have made. Please do not submit a repository link that does not belong to your team.
Alternative instructions for setting up environment locally: If you prefer setting up the build environment locally, your
system must have an x86_64 CPU and a reasonably recent Linux
installed. Here's the list of required tools and external
libraries (note: our CMakeLists.txt relies on the availability
of pc files on your PKG_CONFIG_PATH).
- bash, sed, awk, grep, python3
- pkg-config 0.29.2
- gcc and g++ > 7
- cmake >= 3.13
- jemalloc 5.2.1 (also available as
libjemalloc-devon Ubuntu) - Abseil 20210324.2 (install enabled, build shared)
- GoogleTest 1.11.0 (install enabled, build shared)
Here's a script for
building Abseil and GoogleTest. If you do not want to install
them into the default location at /usr/local,
please replace the installation prefix on line 3. You may pass
-DCMAKE_PREFIX_PATH=the-install-prefix-path to
cmake to allow it find the libraries.
Note: please do not install libgtest-dev
via apt on Ubuntu. It is not a shared-lib build
that we need.
2. lab 1 - File Interface
This is supposed to be a easy lab that walks you through of the process of importing new files into the repository, building, testing, debugging, and submitting the labs. We will also provide a bit more detailed instructions than later labs.
Creating a new branch: we recommend creating a new
branch for every project. For instance, you may create a new
branch named lab1 using the following command: git
checkout -b lab1.
Importing supplemental files into your repository:
Extract lab1.tar.xz in
your local repository root on the student server and import the code:
    cd <dir-to-local-repository>
    tar xf /local/Spring_2024/cse562/lab1.tar.xz
    ./import_supplemental_files.sh
If it is successful, you will see an output similar to below:
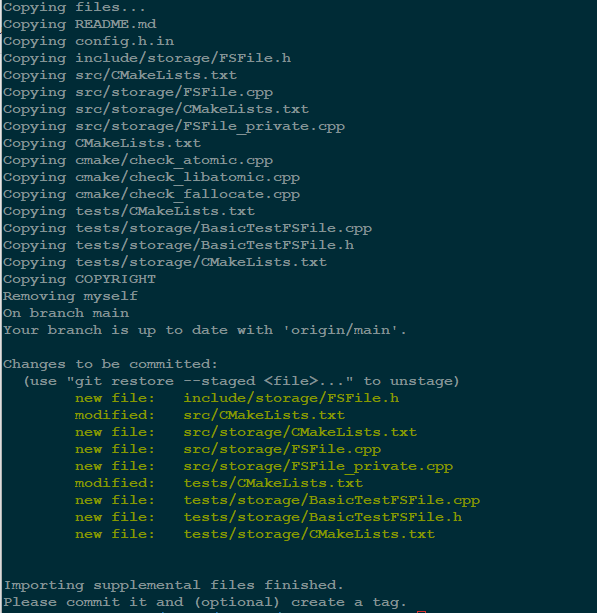
The code should successfully build at the moment but none of
the new tests should pass. We recommend making a tag after
successfully importing the files for each project so that you
will be able to compare your changes against the starting
point. For instance, you may create a tag named
lab1_initial using the following command:
git tag lab1_initial and push it to remote using
git push --tags.
Task: Use the Linux I/O syscalls (e.g.,
open(2), close(2),
pread(2), pwrite(2), etc.) to
implement the FSFile class in
src/storage/FSFile.cpp and
include/storage/FSFile.h. See the header and source
file for requirements and hints.
Note: you may ignore all thread-safety related requirements,
since we will be building a single-threaded database.
Testing and debugging: For lab 1, there are 14 basic
tests BasicTestFSFile.XXX defined in
tests/storage/BasicTestFSFile.cpp and another 14
basic tests BasicTestFSFile.XXXNoFallocate with an additional
--test_never_call_fallocate argument. The NoFallocate
variants test the fallback implementation of
FSFile::Allocate() when fallocate(2)
is not supported by your OS or file system. Your implementation
should pass each of these 28 tests within tens of milliseconds.
There are also 2 hidden system tests
SystemTestFSFile.TestAllocateLarge and
SystemTestFSFile.TestAllocateLargeNoFallocate,
which are not visible to you. You will see the result of
these system tests when you submit the code to Autolab. In
later labs, the hidden tests are those that are more complex,
run on a larger data and/or have a longer running time that
are likely to fail on Autolab -- we will test all the test
cases offline after the deadline and take the higher score in
the Autolab test and the offline test for each of the test
cases. Nevertheless, they should not fail as long as your code
is implemented per specification.
You may use ctest -V to run all the tests as in
the previous lab. Alternatively, you may test and/or debug an
individual test by invoking its binary directly. For instance,
the following shows how to test
BasicTestFSFile.TestCreateFile:
    cd build
    # to test BasicTestFSFile.TestCreateFile
    ./tests/storage/BasicTestFSFile --gtest_filter=BasicTestFSFile.TestCreateFile
    # to list more options
    ./tests/storage/BasicTestFSFile --help
You may debug your code using GDB/VSCode and/or log messages. We
provide a LOG() macro which you can use to print
any messages in your code (see
include/base/logging.h for details). As a concrete
example, you may use the following code to print the value of a
variable x:
    int x = 0;
    // do something with x
    LOG(kInfo, "the value of x is %d", x);
The LOG() macro also throws an exception to
indicate errors if you pass kError or
kFatal as the first argument. You will find
examples in this project.
Note that the log messages are not printed in the tests by
default, because we do not want to print excessive log messages
when we are expecting errors in the function calls during
tests. To enable log message printing, run the test with an
additional --disable_logs=false argument.
    # assuming current working directory is build.Debug or build.Release
    # run BasicTestFSFile.TestCreateFile with log enabled
    ./tests/storage/BasicTestFSFile --disable_logs=false --gtest_filter=BasicTestFSFile.TestCreateFile
Adding additional arguments for VSCode user: open
.vscode/launch.json and locate the configuration
entry matching the test case's name. Then append
the additional arguments to the args array.

Submitting your code: Starting from lab 1, you only need to provide a tag name that references the git commit you want to test. Suppose you have tested your implementation locally, and want to test the latest commit, you may do the following to create a tag:
    git commit -a
    git push
    git tag <some-tag-name>
    git push --tags
Then make a submission at the lab 1 assessment page on Autolab
with the tag name:
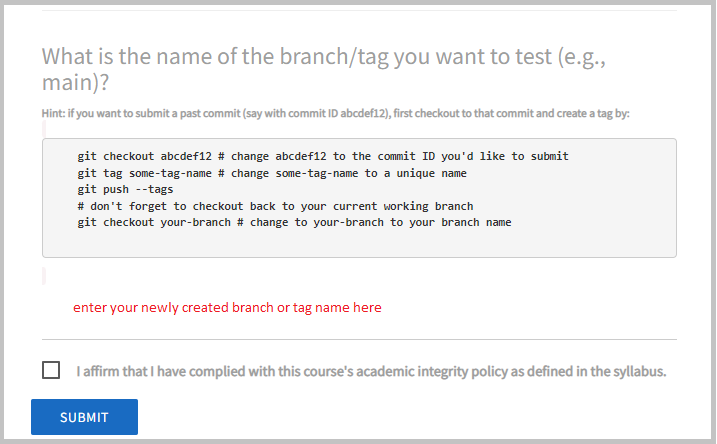
Please do not submit branch names to ensure you are submitting the intended commit (branch HEAD can move when new commits are made while tags never change).