CSE 462/562: Database Systems (Spring 2024)
Project 4: Basic Query Processing
Release date: Thursday, 4/2/2024
Project due: Thursday, 4/25/2024, 23:59 am EDT (exteneded)
Last updated: 4/24/2024
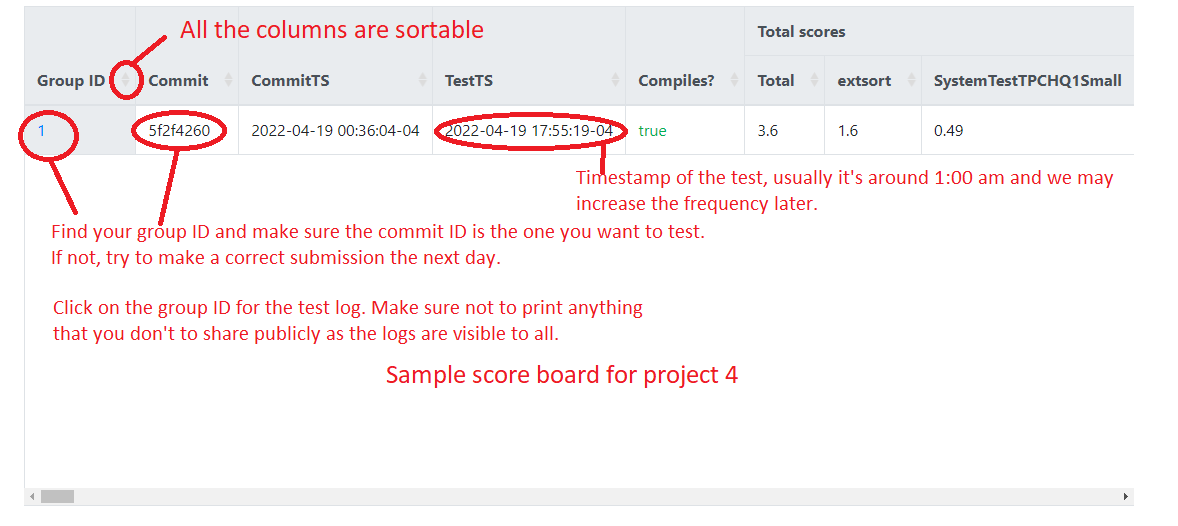
We will run the large system tests at 10 pm, 2 am, 10 am, and 6 pm (new starting on 4/18/2024) every day until the project deadline, which will include the unavailable tests on Autolab. You may find the test results, and nightly test logs through the link above (UB VPN required). Note that, we always test the latest submission on Autolab. To test a specific commit, you should submit the commit that you'd like to be tested to Autolab before 10 pm or 2 am and make no other submissions until around 10:05 pm or 2:05 am. The nightly test board may not be updated until all the groups included in the test are finished, so it may take a while before the results are shown in the link above.
0. Getting Started
This project will be built upon your code for previous projects. If you need
the solution code for projects 1, 2, and/or 3 (to be released on 4/3/2024),
please download it from Autolab, under the attachment sections of Projects 1-3.
To get started with Project 4, extract
/local/Spring_2024/cse562/lab4.tar.xz on the student servers as
you did in previous pojrects. The code should compile without compilation
errors once the supplemental files are imported.
Please also run ./import_data.sh in the repository root to import
data if you're working on the student server. If you're not working on the
student server, please copy the data tarballs into the data
subdirectory (which may not exist yet) under the repository root, and extract
all of them. Once you successfully import the data, you should find the
following directories under data/:
preloaded_btreetpch_s01tpch_s01_anstpch_s1tpch_s1_ans
(IMPORTANT!) Before committing, make sure the
followling lines are added to .gitignore in
your repository to avoid committing these large files to
Github.
/data/preloaded_btree/data/tpch_s01/data/tpch_s01_ans/data/tpch_s1/data/tpch_s1_ans
A few hints:
- Part of this project will heavily rely on your
variable-length data page and B-tree index implementation from the
previous projects, which must exactly match the specification of
the reference implementation. If you experience issues with data
corruptions, you may try replacing
VarlenDataPageand B-tree implementation with the reference implementation that came with Project 3 solution. - Note that the allocated time for this project is tight due to the course schedule. As it also requires you to read and a fair amount of code and write some additional code, so we would recommend starting from day 1.
- The description below is meant to be a brief overview of the tasks. Always refer to the special document blocks in the header and source files for a more detailed specification of how the functions should behave.
- You may add any definition/declaration to the classes or functions you are implementing, but do not change the signature of any public functions. Also, DO NOT edit those source files not listed in source files to modify below, as they will be replaced during tests.
- You may ignore any function/class that’s related to multi-threading and concurrency control since we are building a single-threaded DBMS this semester. Thus, your implementation doesn’t have to be thread-safe.
- We provide a list of tasks throughout
this document, which is a suggestion of the order of
implementation such that your code may pass a few more tests
after you complete a task. It, however, is not the only
possible order, and you may find an alternative order that
makes more sense to you. It is also possible that your code
still could not pass certain tests, which is supposed to
because of some unexpected dependencies on later tasks, in which
case you might want to refer to the test code implementation in the
tests/directory. - If you're working in a team of two, you might want to first go through the list of tasks, agree on a big picture of design, and divide the implementation tasks into indepedent pieces. One strategy is to implement tasks that may be tested independently. Alternatively, you could also design the algorithm and data structures together, and identify independent components to complete. You may also come up with better ways of collaboration that makes more sense to you. In any case, the grade for the code implementation will be based the test result of your group's final submission.
- Specific to projects 5 and 6: we will run performance tests over your implementation using the release build (see Project 1 web page for how to set up release build). Some of the test cases will impose time limits and memory limits, which are calibrated based on the test server. You may not be able to pass it within the time limit if you build the code in debug mode or if the local system is heavily loaded. Because of that, we would recommend running the tests with a higher time/memory limit to debug the correctness first, and then use the nightly test results to help you debug the performance bugs. Note that the debugging symbols are not generated in the release build, so you cannot use GDB or VSCode to debug the binaries in release build.
1. Project Overview
In this project, you will work on the basic operators for query processing in Taco-DB. The goal of this project is to implement the physical plans and execution states for the rest of basic operators for query processing. In addition to the query oprerators, there are also two additional operators for inserting and deleting records from the tables. Note that they must maintain all the indexes over the table if any record is inserted or deleted.
To reduce your workload, we provide the implementation of a few operators for your reference. You might find it useful to read them before starting on the tasks. The operators that you DO NOT need to implement are listed below:
- Most of the expression tree nodes
- Table Scan
- Projection
- Limit
- Temporary Table
- Table Insert
- Table Delete
The following is a list of the query operators that you need to implement.
- Variable expression
- BinaryOperator expression
- Selection (easy)
- Cartesian Product (easy)
- Aggregation (easy)
- Index Scan (not too hard). Make sure your B-Tree implementation conforms to the specification.
- Sort (hardest, using the external merge-sort algorithm)
At the end of this project, you should be able to programmatically construct query plans and execute them. Technically, you will have an (almost) fully functioning single-threaded database (without a SQL parser and an optional query optimizer) after this project. The main theme of this project is going to be quite different from the previous projects. It will focus less on the implementation of algorithms and manipulation of bytes. Rather it will focus more on the common engineering patterns and the memory management. After finishing the first a few operators, you will find all the others follow the same design pattern with subtle differences.
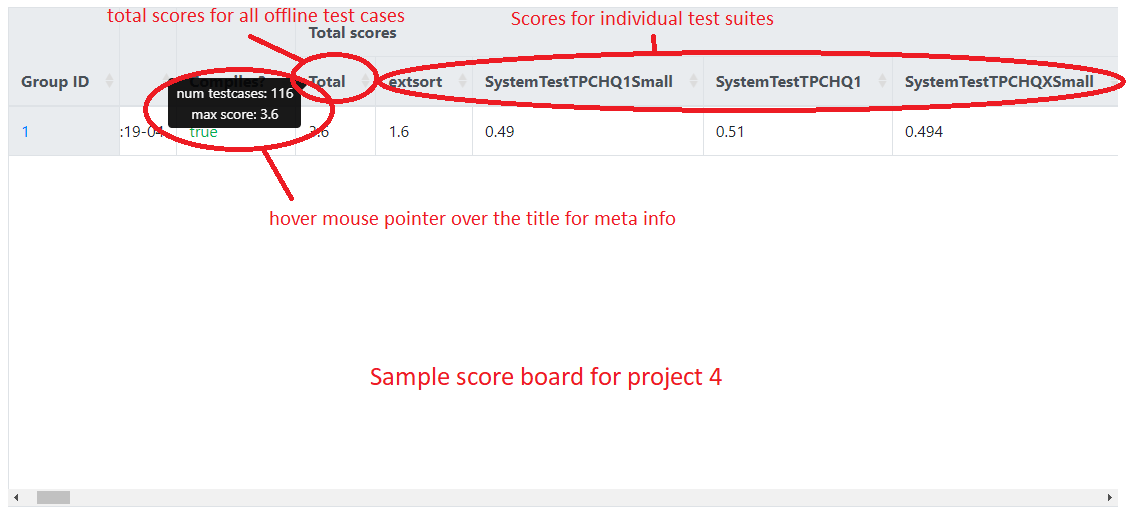
There are basic test cases for each of these operators (including the ones you do not need to implement), which are not meant to be comprehensive coverage test of your implementation. There will be test cases with a few more complex query plans that contain these basic operators to further test the the correctness of the implementation. There will also be a few hidden system tests over the TPC-H benchmark data (a standard database query performance benchmark) with several simplified queries, which will use the basic operators you implemented for the physical plans. In order to pass those tests, you will likely need to extensively test your code using your own test cases. To help you with that, we will release project 6 early, where we will distribute a small scale TPC-H benchmark dataset and a few samples of how to write query plans in the test cases. The Autograder will not be able to run the system tests within a reasonable time, so we will run nightly tests on your latest submission starting from the first day of the project and publish the test results on an anonymous score board for each group every day.
The following shows a break down of all the tests:
| Test suite | Max score | Hidden? | Available on Autolab? | Available in offline test? |
|---|---|---|---|---|
QPBasic
|
5.0 | No | Yes | Yes |
| ExtSort | 2.0 | No | No | Yes |
| SystemTestTPCH* | 4.0 | Yes | No | Yes |
1.1 Trees and Expression Trees
Source files to read:
include/utils/tree/TreeNode.hinclude/expr/ExprNode.hinclude/expr/optypes.h- All expression nodes:
include/expr/*.handsrc/expr/*.cpp
Source files to modify:
include/expr/Variable.hsrc/expr/Variable.cppinclude/expr/BinaryOperator.hsrc/expr/BinaryOperator.cpp
One of the core structures we use in query processing is the
trees. Its basic interfaces and utilities are defined in
TreeNode class. All expressions, physical plans,
and execution states inherit from it. To give a full example of
how to utilize this infrastructure, we provide a reference
implementation of most of the expression trees. The
following description assumes that you understand the basic
concepts of expression trees from any compiler or programming
language course, but you may also refer to any compiler
textbook to understand what an expression tree is.
Expressions trees represent expressions in the SQL language
(such as boolean expressions student.sid =
enrollment.sid, aggregation expressions
AVG(student.adm_year - 1900), arithmetic expressions
DATE '1995-01-01' + interval '5' day, and etc.), which
can be evaluated over a record from a certain schema. Here, different from regular
programming languages where there are global and local variables,
database expressions can refer to a column (in Taco-DB, denoted as Variable),
or a plain literal (e..g, an integer 1900). Based on that,
we can construct compound expressions with operators and function calls.
More specifically, each operator in the expression tree is
represented as an subclass that inherits ExprNode.
To ensure memory safety (i.e., no memory leakage, no double
free, no access after freeing), we always wrap it around as a
unique pointer. We use an interpretation-based strategy to
evaluate the expressions trees. We first call the
ExprNode::Eval() function at the expression tree
root with a record from its outer query plan (e.g., the outer
plan of an expression in the target list of a projection
operator is the projection operator). Then if this is a
non-leaf expression node, it will recursively call the
ExprNode::Eval() functions on its child nodes
(denoting the subexpressions), and apply its own operation over
the subexpression values to produce its evaluation result. A
leaf node of an expression tree is always either a
Literal (which evaluates to a constant) or a
Variable (which evaluates to a field value in the
record from the outer plan). We provide two overloads of the
ExprNode::Eval function on serialized records
(const char*) and deserialized records
(std::vector<NullableDatumRef>). The
function always returns a Datum as return value with full
ownership (i.e., the Datum itself manage the memory for any
pointers of its data). To ensure that, you can see there are
DeepCopy() calls in a few Eval()
implementations. This ensures we make a Datum with full memory
ownership, which will always self-manage its own memory for
memory safety.
Memory management is likely the most challenging part of this project.
You may also find the concepts of rvalue references,
move semantics, and smart pointers of
C++ very useful. You may find many useful information of C++ from CppReference, and in particular, reference,
std::move(), std::unique_ptr, std::shared_ptr.
Hint: you might want to read these references when you're
going through the provided implementation and spot something
that you don't understand. Try to reason about when memory
allocation/deallocation/shallow object copying/deep object
copying happens when we use these constructs, and ask questions
on Piazza if you are unable to understand the provided code.
Task 1: Implement Variable and
BinaryOperator.
Your code will likely pass all the expression node tests in BasicTestExpression at this point.
1.2 Physical Plans & Execution States
Source files to read:
include/plan/PlanNode.hinclude/execution/PlanExecState.hinclude/plan/X.h,include/execution/XState.h,src/plan/X.cpp,src/execution/XState.cpp, whereXis one of the following:- TableScan
- Projection
- Limit
- TempTable
- TableInsert
- TableDelete
Source files to modify:
include/plan/X.h,include/execution/XState.h,src/plan/X.cpp,src/execution/XState.cpp, whereXis one of the following:- Selection
- CartesianProduct
- Aggregation
- IndexScan
- Sort
This part of the work contains all the basic query operators
and table update actions in Taco-DB. There are only a few
specialized join operators not covered here, which we will work
on in project 5.
For each
operator/action, there will be a physical plan (node) and its
corresponding execution state (node). The physical plan of an
operator/action stores all the essential information during
query plan construction
(e.g., its child plan, selection predicate, etc.), while
the plan execution state stores run-time information for evaluating
the physical plan over the current database instance. A new execution
state is created for every execution of a physical plan.
As you can see in the
abstract interface defined in PlanNode and
PlanExecState, a physical plan encodes the
information about the query itself and always contains an output
schema, while an execution state is
essentially an iterator in the volcano model and stores
the internal state of the iterator.
Once again, the biggest challenge in implementing these plans and execution states is to ensure memory safety. In particular, you need to make sure: (1) if a piece of memory can still be accessed, it must be valid for access (i.e., not deallocated); (2) when you finish using a piece of memory, it should be freed by its owner; (3) the total memory usage of the system should be bounded (we will limit the memory you can use in the tests and exceeding memory usage may get the test process terminated).
As a hint, when you are implementing these classes, you need to take some special care on the memory management of these objects:
Deserialized Records: Deserialized records are represented by
std::vector<NullableDatumRef>. You have to make sure all the fields (all instances ofNullableDatumRef) are pointing to a validDatumkept alive by its owner (usually that means it is stored in a local Datum variable or Datum container that is still in scope or a member Datum variable or Datum conatiner of some execution state object). You can ensure this by caching the current record pointed by an execution state internally through astd::vector<Datum>when necessary. Note that in many cases, you don’t have to cache these fields if you know theNullableDatumRefrefers to some Datum that is owned by its child execution state and will be kept alive when the reference is used.Derived Schema: You may need a new schema in some physical operators. In these cases, the plan node should create a new schema and own the object by store it as an
std::unique_ptr<Schema>. You should always callSchema::ComputeLayout()on a newly created schema, because it can only serialize and deserialize records after that call. Do not useSchema::CollectTypeInfo()because the current design of the physical plan and execution state interfaces require any output schema to be able to serialize and deserialize records. Similarly, you don’t always need to create a new schema for a plan if you can directly borrow it from its child.
You are given full freedom on how to implement the internals of these
classes, including class member, debugging utilities, memory management
strategy, etc, as long as you do not change the abstract interfaces of
PlanNode for physical plans and PlanExecState
for execution states.
Note: please read the inlined specification above the definition of these classes in the source code for more hints for implementation.
Also note that: you don't have to implement
the save_position() function and the one-parameter overload of
rewind(DatumRef) function right now.
They will only be needed in project 5. But you do need to implement
the zero-parameter overload of the rewind().
We recommend the following order for this project:
Task 2: Read TempTable and
TempTableState for in-memory temporary tables.
Task 3: Read TableScan and
TableScanState for heap file based table scan.
Task 4: Implement Selection
and SelectionState for selection.
Task 5: Read Projection,
ProjectionState for projection.
Task 6: Implement CartesianProduct and
CartesianProductState for Cartesian products.
Task 7: Implement Aggregation
and AggregationState for aggregation without
group-by (we will not implement the group-by aggregation in
this semester).
Task 8: Read Limit and
LimitState for limiting output to the first N
rows.
Task 9: Read TableInsert,
TableDelete, TableInsertState, and
TableDeleteState for table insert and delete actions.
Task 10: Implement IndexScan and
IndexScanState for index-based table scan.
Task 11: Before proceeding with the
implemention of Sort and SortState
for sorting, please read and complete the tasks 12 and 13 in
Section 1.3.
A side note for sort operator: please use the value of
absl::GetFlag(FLAGS_sort_nways) in
src/execution/SortState.cpp as the default
number of sorted runs to merge at a time for external sorting.
After finishing each of the implementation tasks above, it is very likely that you will be able to pass the corresponding tests for that operator.
After you pass all the individual operator/action tests, a final group of tests will verify if they will work together seamlessly. This ensures that memory safety is satisfied across the plan/execution state tree. Specifically, they are:
BasicTestCompositePlan.TestAggregationQueryBasicTestCompositePlan.TestJoinQuery
Finally, there will be a few hidden system tests running query plans over the TPC-H data. They will not be tested on Autograder. Rather, we will run the tests on your latest submission every day and post the results on an anonymous score board.
1.3 External Merge-Sort
Source file to READ:
include/extsort/ItemIterator.h
Source files to modify:
include/extsort/ExternalSort.hsrc/extsort/ExternalSort.cpp
External sorting in Taco-DB is implemented as a separate
component
since it can be used in various scenarios. Specifically,
it sorts all items (raw byte arrays) provided by an
ItemIterator. Then it returns a unique pointer of
ItemIterator that can be used to iterate through
all the items from input in the sort order. There are two
arguments given to configure the behavior of external sorting.
comp provides the comparator between two general
items, while merge_ways provides the number of
ways to merge at a time, which also means the memory budget for
the buffers used in the merge algorithm is (merge_ways +
1) * PAGE_SIZE.
Task 12: Implement the external merge-sort.
You should read the two file ExternalSort.h
and ExternalSort.cpp. To reduce your workload,
you only need to implement the following functions:
ExternalSort::Sort()ExternalSort::MergeInternalRuns()
There are two stages in external sorting: (1) packing initial
runs, sorting them, and writing them to a temporary file; (2) recursively
read sorted runs from the last pass, and use a multi-way
merge algorithm to generate a new pass. Specifically, you should
limit the total amount of memory you allocated for
input/output buffers to (N + 1) * PAGE_SIZE
(N input buffers and 1 output buffer for each merge).
You only need two temporary files in the whole procedure: one for
writing out the newly generated pass; the other for remembering the last pass as an
input. You also need to remember the boundaries of sorted runs in the
input pass so that you know where to start in merging. Every time when a
new pass is generated and the old pass from which it is generated is not
needed, you can simply continue the next round by flipping the input and
output file. (Hint: you can use
m_current_pass and 1 - m_current_pass to do
this).
In the implementation of external sorting, you should
completely bypass the buffer manager and allocate
your own n_merge_ways + 1 pages of buffer
internally. The ExternalSort object is responsible
for performing all the read/write in the temporary files directly
through the File interface. This is because the
buffer manager only manages data access to main files. Besides,
you want to use VarlenDataPage to help you lay
records out in sorted runs (so you don’t have to reinvent a new
page layout). During the merge, you will need to use a priority
queue. You can directly leverage the implementation provided by
the C++ Standard Template Library. Its detailed documentation
can be found here.
(Hint: STL priority queue put
items with higher priority at the front by default.)
Note: Not every sorted run is full and don’t forget the incomplete run at the end.
Task 13: Implement the output iterator for external sorting. Specifically, you need to implement the following functions:
ExternalSort::OutputIterator::OutputIterator()ExternalSort::OutputIterator::~OutputIterator()ExternalSort::OutputIterator::Next()ExternalSort::OutputIterator::GetCurrentItem()ExternalSort::OutputIterator::SavePosition()ExternalSort::OutputIterator::Rewind()ExternalSort::OutputIterator::EndScan()
This iterator implementation will be very similar to
Table::Iterator and Index::Iterator you have
already implemented. The only extra thing you want to pay attention to
is that this iterator should support rewinding to any previously saved position,
which will be useful for implementing Sort::rewind(DatumRef saved_position)
in the next project. Note that the position information should be encoded in an
uint64_t, and these integers do not have to be continuous
even when two rewind locations are right next to each other.
After finishing Tasks 12 and 13, you should be able to pass the following tests and continue with Task 11:
BasicTestExternalSort.TestSortUniformInt64AscBasicTestExternalSort.TestSortUniformInt64DescBasicTestExternalSort.TestSortUniformStringAscBasicTestExternalSort.TestSortUniformStringDesc
2. Testing and Grading (New)
In this project, we will use Autograder only for the basic tests that may finish in a short amount of time on Autograder, for which you may submit your code and get grading result at any time as before.
For the long-running tests unavailable on Autograder, including the external sorting basic tests and the TPC-H query system tests, we will run them at 10:00 pm and 2:00 am daily on the commit of your group's latest submission to Autograder. The test results are posted on the scoreboard once all the tests are finished, usually within a few minutes after the test runs.
(Important!) to ensure the nightly tests pull the commit that you want to test, make sure the last submission to Autograder prior to 10:00 pm or 2:00 am is accepted with the correct commit ID. In particular, look for the following three lines in your test log on Autograder (two at the beginning and one at the bottom) and make sure the commit ID is the correct one:


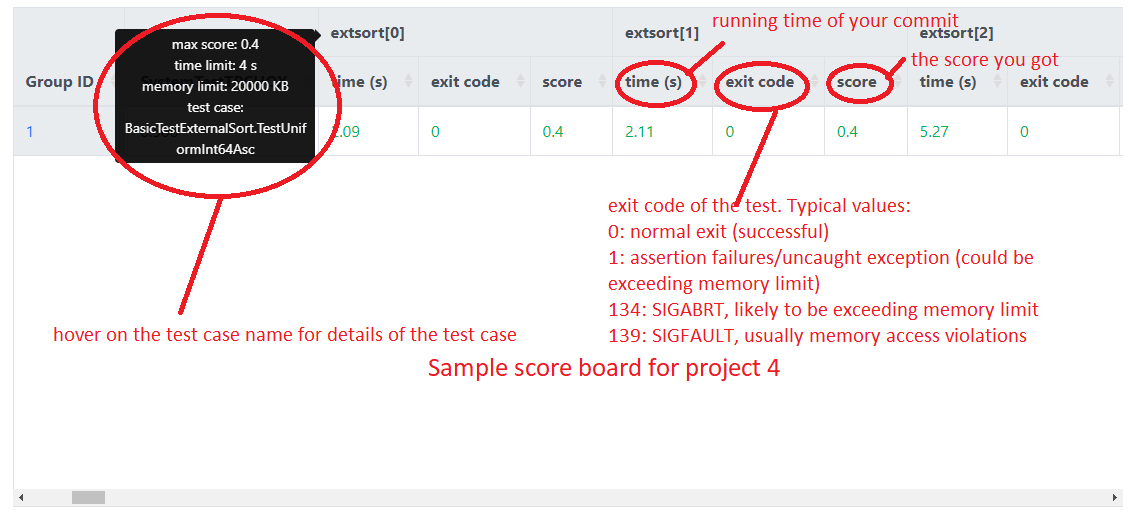
The following figures show the screenshots of a sample scoreboard and provide an explanation of how to interpret the results. Note that group 1 is the reference implementation (solution). The timeout of a test case is usually set to be 2-3x of the running time of the reference implementation and the memory limit is set to a few thousand KB more than what it needs.
How to run large tests locally: if you run the large tests
locally with the debug build, they will likely to time out because
no compiler optimization is enable in debug build. To enable
compiler optimization locally, you'll need to create a new build
directory as follows (assuming the new folder is called
build.Release):
    # in repository root
    cd <dir-to-local-repository>
    cmake -Bbuild.Release -DCMAKE_BUILD_TYPE=Release .
    cd build.Release
    make -j 8
If you're using VSCode, then you can select
a build type by either clicking on this button
 at the bottom,
or opening the command palette and search for
at the bottom,
or opening the command palette and search for CMake: Select Variant.
After that, perform a rebuild of the project.
How to run large tests locally:
We provide a few scripts for running external sorting basic tests with
the default timeout and memory limits set to a higher number. To run the
tests with the default, run ctest -R test_name, or use
the VSCode run configuration,
or:
    cd build.Release
    ./tests/extsort/BasicTestExternalSort.TestXXX.sh # replace XXX with the test names
How to specify memory limits and/or timeouts: While you won't be able to change the memory limits or timeouts we set in the offline tests, but you may need to change these values for your local environment to pass the tests locally. If you need to specify a different memory limit and/or timeouts locally during debugging, you must do so by running it through command line:
    cd build.release
    # set the memory limit to 50000KB and timeout to 100 seconds in the test
    MEMLIMIT=50000 TIMEOUT=100 ./tests/extsort/BasicTestExternalSort.TestXXX.sh # replace XXX with the test names
How to thoroughly test your implementation using TPCHTest
classes: As you might have noticed, there are two new
test files tests/execution/TPCHTest.h and
tests/execution/TPCHTest.cpp. These are the test
fixtures we will use to run queries over TPC-H data in the
system tests in project 4. After you finish all the basic
tests and want to thoroughly test your implementation for
passing the hidden system tests, you can use them to write your
own TPC-H queries and run them over the TPC-H data.